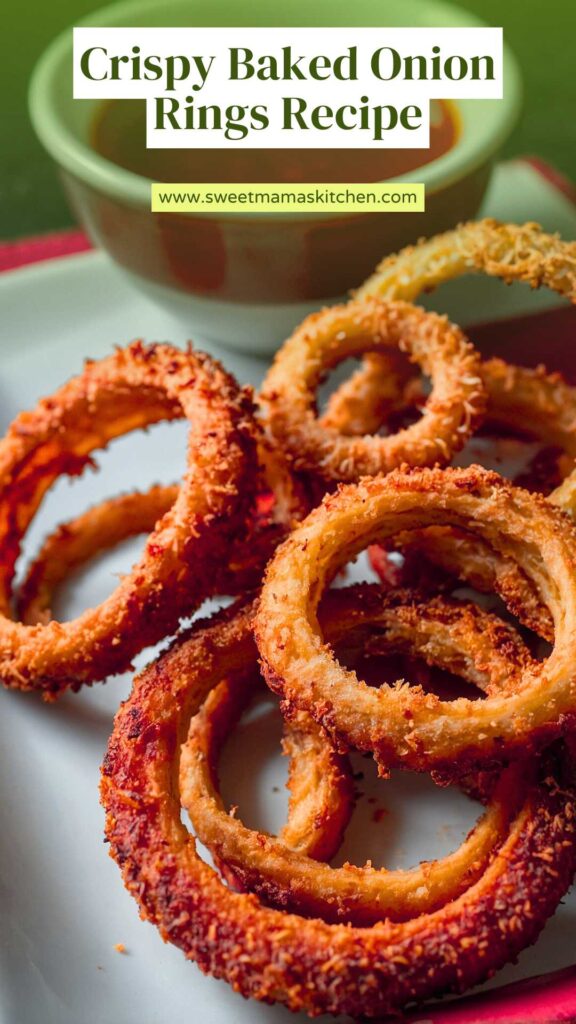
When it comes to enjoying crispy baked onion rings, the possibilities are almost limitless. Think about the perfect pairing.
A juicy burger? Absolutely. A hot dog on game day? You bet. They complement grilled meats, BBQ chicken, and even a simple garden salad.
Trust me, their crunch and flavor elevate any dish. Toss a few onto a platter with dips like homemade ranch, zesty barbecue sauce, or even spicy aioli. These rings are more than a side; they can be the star of your appetizer spread.

you’re gathered with friends and family, laughter fills the air as the aroma of delicious food wafts through the room.
Among the dishes, crispy baked onion rings take center stage. Everyone reaches for them, eager for that satisfying crunch and flavor explosion. But what makes these onion rings stand out from the rest?
This recipe is a game-changer—lighter, crunchier, and packed with seasonings that make them irresistible. As a registered dietitian and food enthusiast, I’ve spent a lot of time perfecting this crispy baked onion ring recipe that doesn’t just look good; it tastes fantastic too.
You Might Also Like These Recipes!
What are Crispy Baked Onion Rings?
Crispy baked onion rings are a delightful spin on the traditional fried version. Instead of submerging those onion slices in hot oil, we coat them in a flavorful mixture and bake them to golden perfection.
The result?
A healthier alternative that retains all the satisfying crunch and taste without the guilt. I’ve tested various methods and ingredients, and I can assure you, this approach gives you onion rings that can charm even the pickiest eaters.
What Makes This Recipe Different from Other Crispy Baked Onion Rings?
When browsing through recipes, you’ll quickly notice many versions that promise great flavor. So what sets this one apart?
For starters, the blend of seasonings takes these rings beyond the ordinary.
By incorporating smoked paprika and a hint of cayenne pepper, you get layers of flavor that you won’t find in standard offerings. Furthermore, the use of seasoned breadcrumbs gives them that extra crunch, craving satisfaction that neither brunch nor snack time can resist.
It’s about balance; the rings have a slight sweetness from the onion, paired perfectly with herbaceous notes from the spices. It’s not just about what goes into the dish; it’s about how it all works together.
How Do They Taste?
Imagine a warm, crispy outer layer yielding to a tender onion at its core. Each bite delivers that subtle sweetness of the onion paired with a savory blend of spices.
Every ring becomes a tiny explosion of joy, creating a delightful experience. Whether served with a side of luscious dipping sauce or enjoyed on their own, these rings dazzle your taste buds.
Ingredients You’ll Need to Make This Dish
To whip up these crispy baked onion rings, gather the following ingredients:
- 1 egg, lightly beaten
- 1/2 cup whole milk
- 1/2 cup all-purpose flour
- 2 large yellow onions, sliced into 1/4 to 1/2 inch thick rings
- 1/4 teaspoon garlic granules
- 1/4 teaspoon onion flakes
- 1/4 teaspoon dried sweet basil
- 1/4 teaspoon dried oregano leaves
- 1/4 teaspoon fine sea salt
- 3/4 teaspoon smoked paprika
- 1/8 teaspoon ground cayenne
- 1/8 teaspoon freshly cracked black pepper
- 1/8 teaspoon ground thyme
- 1 cup seasoned breadcrumbs
- 1/4 teaspoon ground mustard
- 1/2 teaspoon grated parmesan cheese
Step-by-Step Instructions
Step 1: Preheat Your Oven
First, preheat your oven to 450°F (232°C). High heat is essential for achieving that crispy exterior. While it’s warming up, line a baking sheet with parchment paper for easy cleanup.
Step 2: Slice the Onions
Peel the onions and slice them into rings about 1/4 to 1/2 inch thick. The thickness matters; it affects both cooking time and the desired texture. I typically aim for about 1/2 inch. Set those aside for now.
Step 3: Prepare the Coating
In a mixing bowl, combine the half-cup of flour with the garlic granules, onion flakes, basil, oregano, salt, smoked paprika, cayenne, black pepper, and ground thyme. Mix this well; it will provide the flavorful coating for your onion rings.
Step 4: Set Up Your Breading Stations
In another bowl, whisk the egg and milk together until blended. This mixture acts as the binding agent. For the third station, place the seasoned breadcrumbs mixed with a touch of ground mustard and grated parmesan cheese. These will give your onion rings a wonderful crunch!
Step 5: Coat the Onion Rings
Starting with the onion rings, dip each one into the flour mixture, making sure to coat thoroughly. Shake off any excess. Next, move it to the egg mixture, allowing it to soak in before finally transferring it to the breadcrumb mixture. Press gently to ensure an even coating.
Step 6: Arrange and Bake
Place the coated onion rings on the baking sheet. Ensure they are spaced out to allow maximum air circulation. Pop them into the pre-heated oven.
Step 7: Bake to Perfection
Let them bake for about 15-20 minutes, flipping them halfway through for even browning. When they reach a golden hue, they’re ready to be savored.

Tips & Tricks on Making Crispy Baked Onion Rings
- Choose the Right Onions: I prefer yellow onions for their sweetness. You may also experiment with red or sweet onions.
- Let Them Rest: After coating, let the rings sit for a bit before baking. This helps the breading stick better.
- Don’t Overcrowd: Air circulation is key for crispiness. Give those rings room to breathe on the baking sheet.
- Use a Variety of Breadcrumbs: Panko breadcrumbs can take the crunch to another level.
- Spray or Brush with Oil: A light misting of oil before baking enhances browning and crunchiness.
Nutrition Information
Crispy Baked Onion Rings Recipe Nutrition Facts

How Do I Store This Dish?
Storing leftovers? No problem. Allow the onion rings to cool completely before placing them in an airtight container. They can last in the refrigerator for up to 3 days. If you want to keep that crispy texture, reheat them in the oven at 375°F (190°C) for about 10 minutes.
What Other Substitutes Can You Use in Crispy Baked Onion Rings?
If you want to experiment with the recipe, consider the following substitutes:
- Sweet Potatoes: Slice them into rings; they work beautifully and offer added nutrition.
- Zucchini: Cut into thick rounds, zucchini can be an exciting alternative that’s slightly different from traditional onion rings.
- Other Types of Onions: Red onions provide a bolder color and flavor, while green onions offer a milder taste.
- Gluten-Free Bread Crumbs: For a gluten-free option, simply substitute standard breadcrumbs with gluten-free varieties.
- Spices: Enhance the flavor further by adding your favorite spices, like cumin or Italian seasoning, to the breadcrumb mixture.
Conclusion
Crispy baked onion rings are a perfect addition to any meal or gathering. They bring joy and crunch every time. With this recipe, you’re not just getting a snack; you’re gaining a foolproof way to impress family and friends.
Feel free to modify and tweak the seasonings to suit your palate. Remember, cooking should be fun and a little adventurous! Get creative, savor the process, and most importantly, enjoy those crispy baked onion rings at your next get-together.
Friends and family will not be able to resist going back for more.
You Might Also Like These Latest Recipes!

Crispy Baked Onion Rings Recipe – Sweet Mama’s Kitchen
Description
you're gathered with friends and family, laughter fills the air as the aroma of delicious food wafts through the room.
Among the dishes, crispy baked onion rings take center stage. Everyone reaches for them, eager for that satisfying crunch and flavor explosion. But what makes these onion rings stand out from the rest?
Ingredients
Instructions
Step 1: Preheat Your Oven
-
First, preheat your oven to 450°F (232°C). High heat is essential for achieving that crispy exterior. While it's warming up, line a baking sheet with parchment paper for easy cleanup.
Step 2: Slice the Onions
-
Peel the onions and slice them into rings about 1/4 to 1/2 inch thick. The thickness matters; it affects both cooking time and the desired texture. I typically aim for about 1/2 inch. Set those aside for now.
Step 3: Prepare the Coating
-
In a mixing bowl, combine the half-cup of flour with the garlic granules, onion flakes, basil, oregano, salt, smoked paprika, cayenne, black pepper, and ground thyme. Mix this well; it will provide the flavorful coating for your onion rings.
Step 4: Set Up Your Breading Stations
-
In another bowl, whisk the egg and milk together until blended. This mixture acts as the binding agent. For the third station, place the seasoned breadcrumbs mixed with a touch of ground mustard and grated parmesan cheese. These will give your onion rings a wonderful crunch!
Step 5: Coat the Onion Rings
-
Starting with the onion rings, dip each one into the flour mixture, making sure to coat thoroughly. Shake off any excess. Next, move it to the egg mixture, allowing it to soak in before finally transferring it to the breadcrumb mixture. Press gently to ensure an even coating.
Step 6: Arrange and Bake
-
Place the coated onion rings on the baking sheet. Ensure they are spaced out to allow maximum air circulation. Pop them into the pre-heated oven.
Step 7: Bake to Perfection
-
Let them bake for about 15-20 minutes, flipping them halfway through for even browning. When they reach a golden hue, they’re ready to be savored.
Nutrition Facts
Servings 4
- Amount Per Serving
- Calories 227kcal
- % Daily Value *
- Total Fat 3.4g6%
- Saturated Fat 1.2g6%
- Cholesterol 57mg19%
- Sodium 2708mg113%
- Total Carbohydrate 37g13%
- Dietary Fiber 5g20%
- Sugars 8g
- Protein 6g12%
* Percent Daily Values are based on a 2,000 calorie diet. Your daily value may be higher or lower depending on your calorie needs.
Note
- Choose the Right Onions: I prefer yellow onions for their sweetness. You may also experiment with red or sweet onions.
- Let Them Rest: After coating, let the rings sit for a bit before baking. This helps the breading stick better.
- Don’t Overcrowd: Air circulation is key for crispiness. Give those rings room to breathe on the baking sheet.
- Use a Variety of Breadcrumbs: Panko breadcrumbs can take the crunch to another level.
Spray or Brush with Oil: A light misting of oil before baking enhances browning and crunchiness.


