Homemade Samoas Girl Scout Cookies Recipe – Sweet Mama’s Kitchen
Before we dive deep into the world of homemade Samoas, let's set the scene. These delicious cookies are a fantastic treat on their own, but they shine even more with the right pairings. Imagine enjoying them alongside a steaming cup of coffee or a tall glass of cold milk. The warmth of the coffee enhances the caramel flavors while the milk leaves you feeling nostalgic—a perfect childhood treat.
For a more adventurous pairing, consider a scoop of creamy vanilla ice cream. The coolness and richness of the ice cream complement the texture of the cookie, creating a delightful contrast. If you're feeling inspired, a light fruit salad could work wonderfully; the freshness of the fruit cuts through the sweetness of the Samoas, balancing the flavors beautifully.
Now, with those delicious ideas in mind, let’s explore the fun and straightforward journey of making homemade Samoas Girl Scout cookies!
Let me take you back to my childhood, where the allure of those iconic green boxes filled with Girl Scout cookies would send my heart racing. Among the selections, Samoas stood out like a diamond in a sea of costume jewelry.
I remember selling them as a scout, hoping to earn enough for camp, but it was always about the joy of biting into that chewy coconut, the silky chocolate, and the delightful crunch.
As I grew older, my passion for cooking flourished. It wasn't long before I decided it was time to create my own version of those beloved cookies. The best part? I could make them even better, tailored perfectly to my taste. That’s where today’s recipe comes in. Homemade Samoas bring back nostalgia while allowing you to enjoy a delightful treat that you can whip up in your kitchen.
What is the Homemade Samoas Girl Scout Cookies Recipe?
This recipe is a labor of love. It combines a rich buttery base with a sweet coconut topping and a luscious chocolate coat. You’ll have a crunchy yet chewy sensation that is utterly irresistible. Creating these cookies is an adventure. It requires patience, but the outcome is worth every minute spent in the kitchen.
Why This Recipe Works
The combination of flavors in homemade Samoas is designed to create a balance—sweetness from the caramel, a hint of salt from the dough, and the comforting richness of chocolate.
Using quality ingredients elevates this cookie, ensuring each bite is packed with flavor. Also, making them at home means you can customize aspects, such as the thickness of the chocolate layer or the amount of coconut.
What You'll Need to Make This Dish
Creating these delightful cookies calls for a handful of common ingredients. Here's what you'll need:
For the Coconut Topping:
12 ounces bittersweet dark chocolate
1 teaspoon ground cinnamon
3 cups sweetened shredded coconut
20 ounces store-bought caramel sauce
2 tablespoons whole milk
For the Base Dough:
½ cup granulated sugar
¼ teaspoon baking powder
1 teaspoon freshly grated lemon zest
½ teaspoon pure vanilla extract
½ teaspoon fine sea salt
2 cups plain all-purpose flour
2 sticks (1 cup) unsalted butter, softened to room temperature
2 tablespoons whole milk
How to Make Homemade Samoas Girl Scout Cookies Recipe
While making homemade Samoas can sound daunting, the process is very approachable. You'll begin with the base dough, then prepare the coconut topping, and finalizing with the decadent chocolate coat.
Step 1: Prepare the Base Dough
Begin by gathering your ingredients for the base dough. In a large bowl, cream together the softened butter and sugar. The butter should be just soft enough to mix easily. This creates a fluffy mixture that ensures the cookies are soft yet sturdy.
Once your butter and sugar are creamed, add in the vanilla extract, lemon zest, and milk. This is where you really bring out the flavor. Mix until everything is well combined.
Next, whisk together the flour, baking powder, and salt in a separate bowl. Gradually add this mixture into the wet ingredients. The dough will be thick—this is exactly what you want. Once combined, wrap it in plastic wrap and refrigerate for at least an hour. It firms up and makes rolling easier.
Step 2: Roll and Cut the Cookies
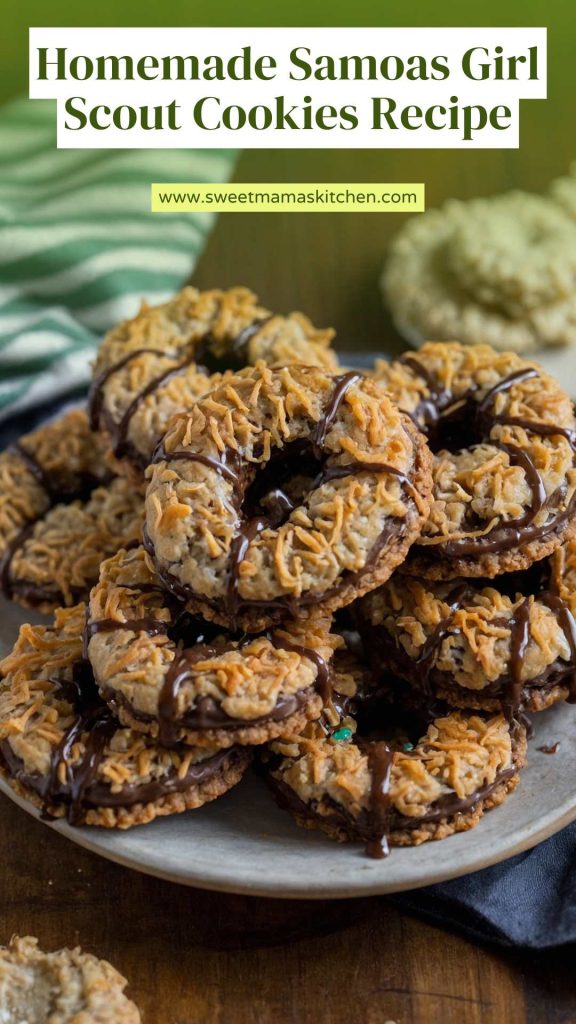
Preheat your oven to 350°F (175°C). After chilling, take the dough out. On a floured surface, roll it to about ¼ inch thick. Use a round cookie cutter to cut out circles, then use a smaller cutter to create the signature hole in the center. Not only does this make them iconic, but it also allows for maximum coconut-caramel-chocolate exposure.
Place the cut-out cookies on a parchment-lined baking sheet. Bake them for approximately 10 minutes or until they are lightly golden. Remove from the oven and let them cool completely on a wire rack.
Step 3: Prepare the Coconut Topping
While the cookies cool, it’s time to make the topping. In a saucepan, combine shredded coconut, caramel sauce, and cinnamon. Heat over medium heat until everything is heated through and the coconut is well-coated. When done, let it cool slightly before spreading over the cookies.
Step 4: Assemble the Cookies
Once the cookies have cooled and the coconut topping has set, it’s time to conduct the final assembly. Spread a generous layer of the coconut mixture on each cookie, creating that signature mound.
Step 5: Dip in Chocolate
Melt the bittersweet chocolate in a double boiler (or a microwave in short bursts, stirring to avoid burning). Dip the bottom of each cookie into the chocolate, then return to the parchment-lined sheet. Once all cookies are dipped, drizzle remaining chocolate on top for that beautiful finish.
Step 6: Let Harden
Let the cookies harden at room temperature. If you're in a hurry, you can pop them into the refrigerator. Once set, they are ready to enjoy!
Tips for Success
To ensure your homemade Samoas turn out fantastic, consider these tips:
Use Quality Ingredients: The flavor is in the details. Choose a high-quality chocolate for dipping; it makes a world of difference.
Don’t Skimp on Chilling Time: Letting the dough chill is crucial. It keeps the cookies from spreading too much during baking.
Adjust the Chocolate To Your Liking: If you prefer a thicker chocolate coating, feel free to dip them twice!
Store Cookies in an Airtight Container: They will stay fresh longer. Place parchment paper between layers if stacking.
Experiment with Coconut to Your Preference: Some like it chunky; others prefer a finer texture. Adjust to your preference.
How to Store Leftovers
If you find yourself with leftover cookies (a rare occurrence!), store them in an airtight container at room temperature. They retain their flavor and texture well, but they usually don’t last long because they’re so delicious! For longer storage, consider freezing them. Just make sure you separate layers with parchment paper to prevent them from sticking together.
Nutrition Information
For those watching their nutrition, each homemade Samoa contains approximately:
Calories: 180
Total Fat: 10g
Saturated Fat: 6g
Carbohydrates: 22g
Sugar: 12g
Protein: 2g
Adjustments can be made for different dietary considerations, especially if you substitute ingredients to modify fat or calories.
How Would I Recommend Serving Homemade Samoas Girl Scout Cookies Recipe?
When you’re ready to share these delights, consider these serving suggestions:
With a Warm Beverage: Pairing each cookie with hot coffee or tea enhances their flavor. The warmth complements the richness and contrasts the coolness of the caramel.
As Part of a Dessert Platter: Place them on a platter with other homemade desserts for variety—this makes a stunning presentation for gatherings.
In Ice Cream Sandwiches: Place two cookies around a scoop of your favorite ice cream—hey, who can resist an ice cream sandwich?
Paired with Fresh Berries: The tanginess of berries beautifully offsets the sweetness of the cookies. It’s like a match made in heaven!
What Alternatives Can You Use for the Ingredients If Not Available?
If you find yourself without certain ingredients, don’t sweat it! Here are some substitutes that work surprisingly well:
For Unsalted Butter, Use Coconut Oil: It adds a different flavor, but it’s a great dairy-free choice. Just ensure it’s solid, not melted.
Instead of Granulated Sugar, Try Coconut Sugar: This gives a nice caramel flavor and works beautifully in the dough.
If You Don't Have Whole Milk, Almond Milk Can Be Used: It’s an easy swap that many won’t even notice!
In Place of Cocoa Powder, Use Carob Powder: If you want to avoid chocolate altogether, carob offers a unique flavor profile.
Conclusion
In conclusion, homemade Samoas are not just cookies; they’re a family tradition, a reminder of childhood, and an example of what joy can be found in baking. The process isn’t complicated, but it involves love and care, resulting in treats that are both nostalgic and delicious.
So, roll up your sleeves, gather your ingredients, and get ready to experience the satisfaction that comes from baking your own Samoas. They’re bound to become a staple in your kitchen, and you might just find yourself craving them more often than you’d admit. Enjoy the sweetness, share the bounty, and don’t forget to savor every single bite!
Let me take you back to my childhood, where the allure of those iconic green boxes filled with Girl Scout cookies would send my heart racing. Among the selections, Samoas stood out like a diamond in a sea of costume jewelry.
I remember selling them as a scout, hoping to earn enough for camp, but it was always about the joy of biting into that chewy coconut, the silky chocolate, and the delightful crunch.
As I grew older, my passion for cooking flourished. It wasn't long before I decided it was time to create my own version of those beloved cookies. The best part? I could make them even better, tailored perfectly to my taste. That’s where today’s recipe comes in. Homemade Samoas bring back nostalgia while allowing you to enjoy a delightful treat that you can whip up in your kitchen.
Ingredients
For the Coconut Topping:
12ounces bittersweet dark chocolate
1teaspoon ground cinnamon
3cups sweetened shredded coconut
20ounces store-bought caramel sauce
2tablespoons whole milk
For the Base Dough:
½cup granulated sugar
¼teaspoon baking powder
1teaspoon freshly grated lemon zest
½teaspoon pure vanilla extract
½teaspoon fine sea salt
2cups plain all-purpose flour
2sticks(1 cup)
2tablespoons whole milk
Instructions
1
While making homemade Samoas can sound daunting, the process is very approachable. You'll begin with the base dough, then prepare the coconut topping, and finalizing with the decadent chocolate coat.
Step 1: Prepare the Base Dough
2
Begin by gathering your ingredients for the base dough. In a large bowl, cream together the softened butter and sugar. The butter should be just soft enough to mix easily. This creates a fluffy mixture that ensures the cookies are soft yet sturdy.
3
Once your butter and sugar are creamed, add in the vanilla extract, lemon zest, and milk. This is where you really bring out the flavor. Mix until everything is well combined.
4
Next, whisk together the flour, baking powder, and salt in a separate bowl. Gradually add this mixture into the wet ingredients. The dough will be thick—this is exactly what you want. Once combined, wrap it in plastic wrap and refrigerate for at least an hour. It firms up and makes rolling easier.
Step 2: Roll and Cut the Cookies
5
Preheat your oven to 350°F (175°C). After chilling, take the dough out. On a floured surface, roll it to about ¼ inch thick. Use a round cookie cutter to cut out circles, then use a smaller cutter to create the signature hole in the center. Not only does this make them iconic, but it also allows for maximum coconut-caramel-chocolate exposure.
6
Place the cut-out cookies on a parchment-lined baking sheet. Bake them for approximately 10 minutes or until they are lightly golden. Remove from the oven and let them cool completely on a wire rack.
Step 3: Prepare the Coconut Topping
7
While the cookies cool, it’s time to make the topping. In a saucepan, combine shredded coconut, caramel sauce, and cinnamon. Heat over medium heat until everything is heated through and the coconut is well-coated. When done, let it cool slightly before spreading over the cookies.
Step 4: Assemble the Cookies
8
Once the cookies have cooled and the coconut topping has set, it’s time to conduct the final assembly. Spread a generous layer of the coconut mixture on each cookie, creating that signature mound.
Step 5: Dip in Chocolate
9
Melt the bittersweet chocolate in a double boiler (or a microwave in short bursts, stirring to avoid burning). Dip the bottom of each cookie into the chocolate, then return to the parchment-lined sheet. Once all cookies are dipped, drizzle remaining chocolate on top for that beautiful finish.
Step 6: Let Harden
10
Let the cookies harden at room temperature. If you're in a hurry, you can pop them into the refrigerator. Once set, they are ready to enjoy!
Nutrition Facts
Servings 6
Amount Per Serving
Calories180kcal
% Daily Value *
Total Fat10g16%
Saturated Fat6g30%
Total Carbohydrate22g8%
Sugars12g
Protein2g4%
* Percent Daily Values are based on a 2,000 calorie diet. Your daily value may be higher or lower depending on your calorie needs.
Note
To ensure your homemade Samoas turn out fantastic, consider these tips:
Use Quality Ingredients: The flavor is in the details. Choose a high-quality chocolate for dipping; it makes a world of difference.
Don’t Skimp on Chilling Time: Letting the dough chill is crucial. It keeps the cookies from spreading too much during baking.
Adjust the Chocolate To Your Liking: If you prefer a thicker chocolate coating, feel free to dip them twice!
Store Cookies in an Airtight Container: They will stay fresh longer. Place parchment paper between layers if stacking.
Experiment with Coconut to Your Preference: Some like it chunky; others prefer a finer texture. Adjust to your preference.
Keywords:
Homemade Samoas Girl Scout Cookies Recipe
Susan Roberts
Registered Dietitian & Food Enthusiasts
Susan Roberts is a California-based registered dietitian and the creator of Sweet Mama’s Kitchen, where she shares simple, comforting, and nutritious home-cooked recipes. As a busy mom, she focuses on easy, wholesome meals that bring joy to the table without sacrificing flavor. Susan’s passion lies in helping others create delicious, family-friendly dishes with love and confidence.