Susan Roberts
There’s nothing quite like a steaming mug of homemade apple cider on a crisp California afternoon. This recipe transforms simple apples into something deeply comforting—the kind of drink that fills your kitchen with that cozy, spiced aroma that makes everyone feel at home. I’ve paired this with our these homemade cookies for the perfect seasonal pairing, or serve it alongside our Apple Cinnamon Bread Loaf Recipe for a complete fall experience.
The Story Behind My Favorite Slow Cooker Cider
I’ll never forget the October morning my daughter came home from school talking about apple picking at a local orchard. She was five, maybe six, with juice dripping down her chin and this pure joy radiating from her whole body. We came home with what felt like a bushel of apples—way more than we could reasonably eat fresh.
That’s when my mom called with this recipe. She walked me through making cider in the slow cooker while my kids played in the backyard, and suddenly our kitchen smelled like cinnamon and possibility. It became our ritual—every September through November, we’d make a big batch. My kids would help me quarter the apples (with very dull knives, of course), and we’d sip warm mugs while discussing their day.
Now, as a registered dietitian, I appreciate that this recipe is naturally lower in added sugar than most store-bought versions, with the fruit doing most of the sweetening work. But honestly? I still make it because of those memories and because it brings everyone together around warmth and flavor.
What is Homemade Apple Cider?
True apple cider is fresh-pressed apple juice—not the spiced cider drink or hard cider you might find at a cidery. What makes it special is simplicity: apples, a touch of sweetener, warm spices, and time. Unlike commercial ciders that are often pasteurized or heavily processed, making it yourself means you control every ingredient and preserve the fresh, bright apple flavor.
The slow cooker method is genius because it gently extracts all the flavor from the apples without requiring special equipment. You’re essentially creating a concentrated apple-forward beverage infused with cinnamon, cloves, and orange brightness. The result is naturally sweet, deeply aromatic, and something your whole family can enjoy—whether they’re toddlers or teens.
This version is slightly different from what you’d get at a cider mill (which uses a press), but it captures that authentic, home-spiced essence that makes fall special. Plus, it’s a fantastic way to use up apples before they go to waste.
Why You’ll Love This Homemade Apple Cider Recipe
- No Special Equipment Needed – Your slow cooker does all the work. No cider press, no fancy juicer. Just let time and gentle heat work their magic while you handle other tasks.
- Naturally Sweetened – The apples provide most of the sweetness, with just a modest amount of added sugar. As a registered dietitian, I appreciate recipes where fruit is the hero, not the supporting character.
- Fills Your Home With Autumn Magic – The aroma alone is worth the effort. It’s the smell of fall captured in a slow cooker, and it makes your whole house feel like a cozy gathering place.
- Makes Enough for a Crowd – This batch yields about 8-10 generous servings, perfect for fall gatherings, parties, or freezing portions for later.
- Flavor-Forward and Spiced Just Right – The combination of cinnamon, cloves, and orange creates depth without tasting artificial or overly processed.
- Pairs With Everything – Serve it alongside breakfast treats, afternoon snacks, or after-dinner gatherings. It’s completely versatile.
- Budget-Friendly Fall Fun – If you have access to farmers market apples or your own trees, this becomes an incredibly economical way to preserve the harvest.
The Ingredients
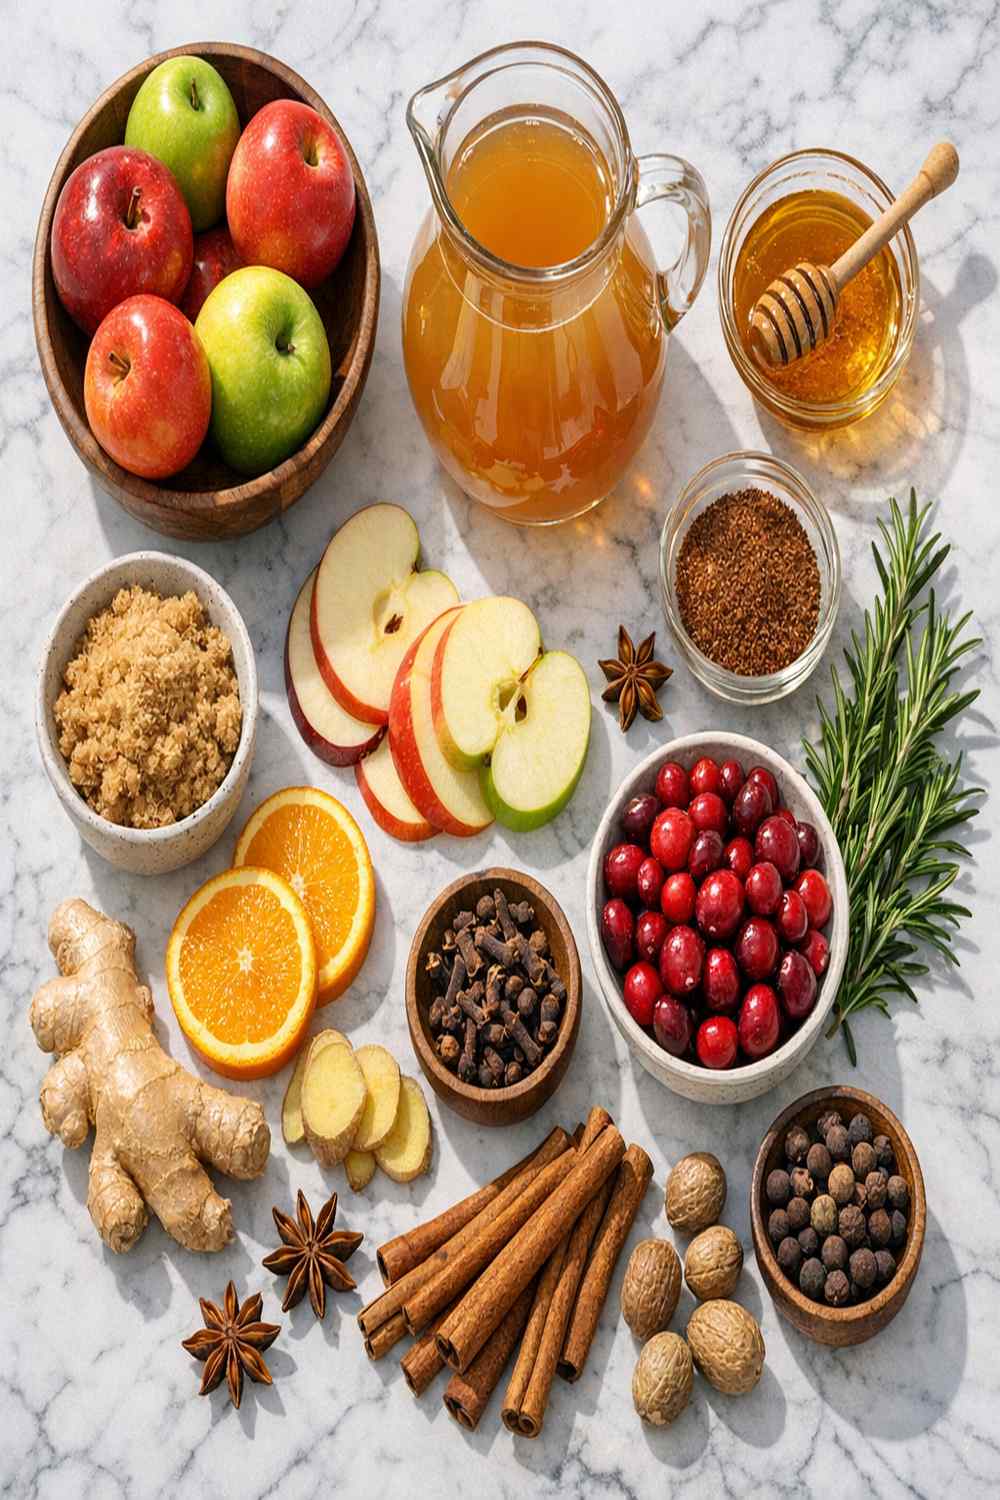
When it comes to making great cider, ingredient selection matters deeply. I’m particular about my apple choices, the quality of spices, and even the water I use. Here’s exactly what you’ll need, along with my professional shopping notes.
- ½ teaspoon fresh nutmeg, finely grated (optional but adds wonderful warmth and depth)
- 4 cinnamon sticks, or 1 tablespoon ground cinnamon (I prefer sticks for easier straining and deeper flavor)
- 8-10 cups filtered water (or enough to just cover the fruit; filtered removes any chlorine taste)
- 10 medium apples—mixed varieties (I use a combination of Honeycrisp for sweetness and Granny Smith for tartness; this balance creates complexity)
- 1 large navel orange (fresh is essential; the brightness cuts through the spice beautifully)
- 6 tablespoons granulated sugar (about 75 grams; adjust based on your apple varieties’ natural sweetness)
- 1 teaspoon ground cloves (freshly ground if possible; store-bought loses potency after 6 months)
- 2 star anise pods (optional; adds a subtle licorice note that rounds out the spice profile)
How to Make Homemade Apple Cider?
The process is straightforward, but I’ve found that paying attention to a few small details makes all the difference in the final flavor. Here’s my complete walkthrough, including the sensory cues that tell you everything is progressing beautifully.
Step 1: Prepare Your Citrus Base
Start by thoroughly rinsing your orange under cool running water and gently scrubbing it with a clean brush to remove any residue. Using your fingers or a small paring knife, peel away the orange skin in thick strips, leaving as much of the bitter white pith behind as possible. Separate the orange into individual segments and place them directly into your slow cooker (a 4-quart or larger capacity). The orange segments will become soft and will help create a natural sweetness and brightness to your cider. I typically let them sit here for a minute while I prepare the apples—there’s no rush.

Step 2: Prepare and Add the Apples
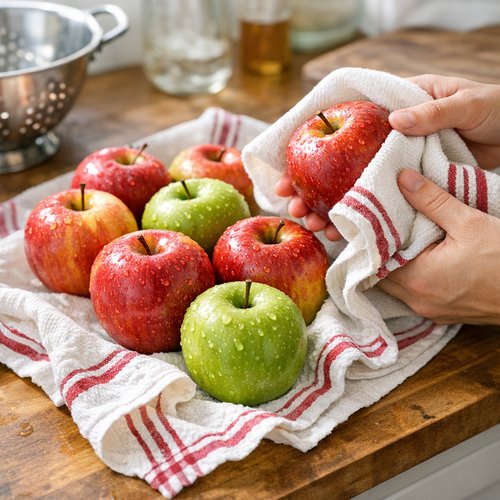
Rinse all 10 apples thoroughly under running water and pat them dry with a clean kitchen towel. This simple step prevents any dirt or residue from getting into your cider. Working over the slow cooker (to catch any juices), cut each apple into quarters, removing the core as you go. You can discard the cores, seeds, and stems—they’re not needed. Don’t peel the apples; the skin adds valuable color, nutrients, and tannins that contribute to the complex flavor profile. The apple pieces should tumble into the slow cooker on top of your orange segments. You’ll see the fruit start to glisten almost immediately, which is a beautiful sign.
Step 3: Add Your Spices and Sweetener
Nestle the cinnamon sticks into the fruit mixture (or sprinkle ground cinnamon if using). Add your ground cloves—this is where the magic begins. You’ll immediately smell that warm, aromatic spice beginning to release. Sprinkle the granulated sugar evenly over everything. If you’re using optional nutmeg and star anise, add those now. Stir gently with a long spoon to distribute the sugar and spices throughout the fruit.

Step 4: Add Water and Begin Cooking
Pour filtered water over the fruit mixture until it’s just barely covered—you want the fruit sitting in liquid, but you don’t need excess water, as the apples will release their own juice during cooking. This typically requires 8 to 10 cups of water, but add gradually and look for that “just covered” point. Cover your slow cooker with the lid and set it to low heat for 6 to 7 hours (or high heat for 4 hours if you’re short on time). Low and slow is my preference because it gently extracts flavor without concentrating it too intensely.
As it cooks, your kitchen will fill with the most incredible aroma—cinnamon, cloves, apples, and orange melding into something completely irresistible. Resist the urge to open the lid constantly, though it’s tempting!

Step 5: Mash the Cooked Fruit
After 6 to 7 hours on low (or 4 hours on high), open your slow cooker carefully—the steam will be fragrant and hot. The apples should be completely soft and almost falling apart. Using tongs or a large slotted spoon, carefully remove the cinnamon sticks and set them aside on a clean plate. Using a sturdy spoon or a potato masher, gently press down on the fruit to break it apart and release more of its juices into the liquid. You’re not making applesauce here—just crushing things enough to increase extraction. Return those cinnamon sticks to the pot, place the lid back on, and cook for 1 additional hour on low or high heat.

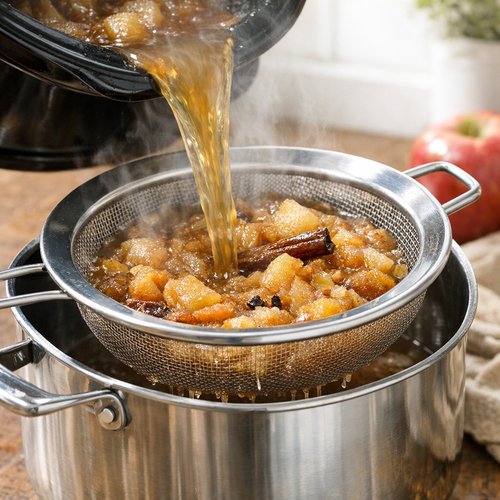
Step 6: Strain Your Cider
This is where patience pays off. Position a large pot or heat-safe pitcher near your slow cooker. Set a fine mesh strainer over the top of your pot. Working slowly and carefully (the cider will be hot), pour the contents of your slow cooker through the strainer. You’ll hear the liquid draining and see the solids—the pulp, skins, and flesh—collecting in the strainer. Let it drain completely; don’t force anything through. This will take several minutes.
Once the majority has drained, you can gently press the solids with the back of a spoon to extract just a bit more liquid, but don’t over-process this. Discard all the solids. Now comes the second straining, which is the professional touch that makes your cider crystal clear: pour the cider through a fine mesh strainer one more time, working slowly to catch any remaining pulp particles. Your finished cider should be a beautiful deep amber or golden color.
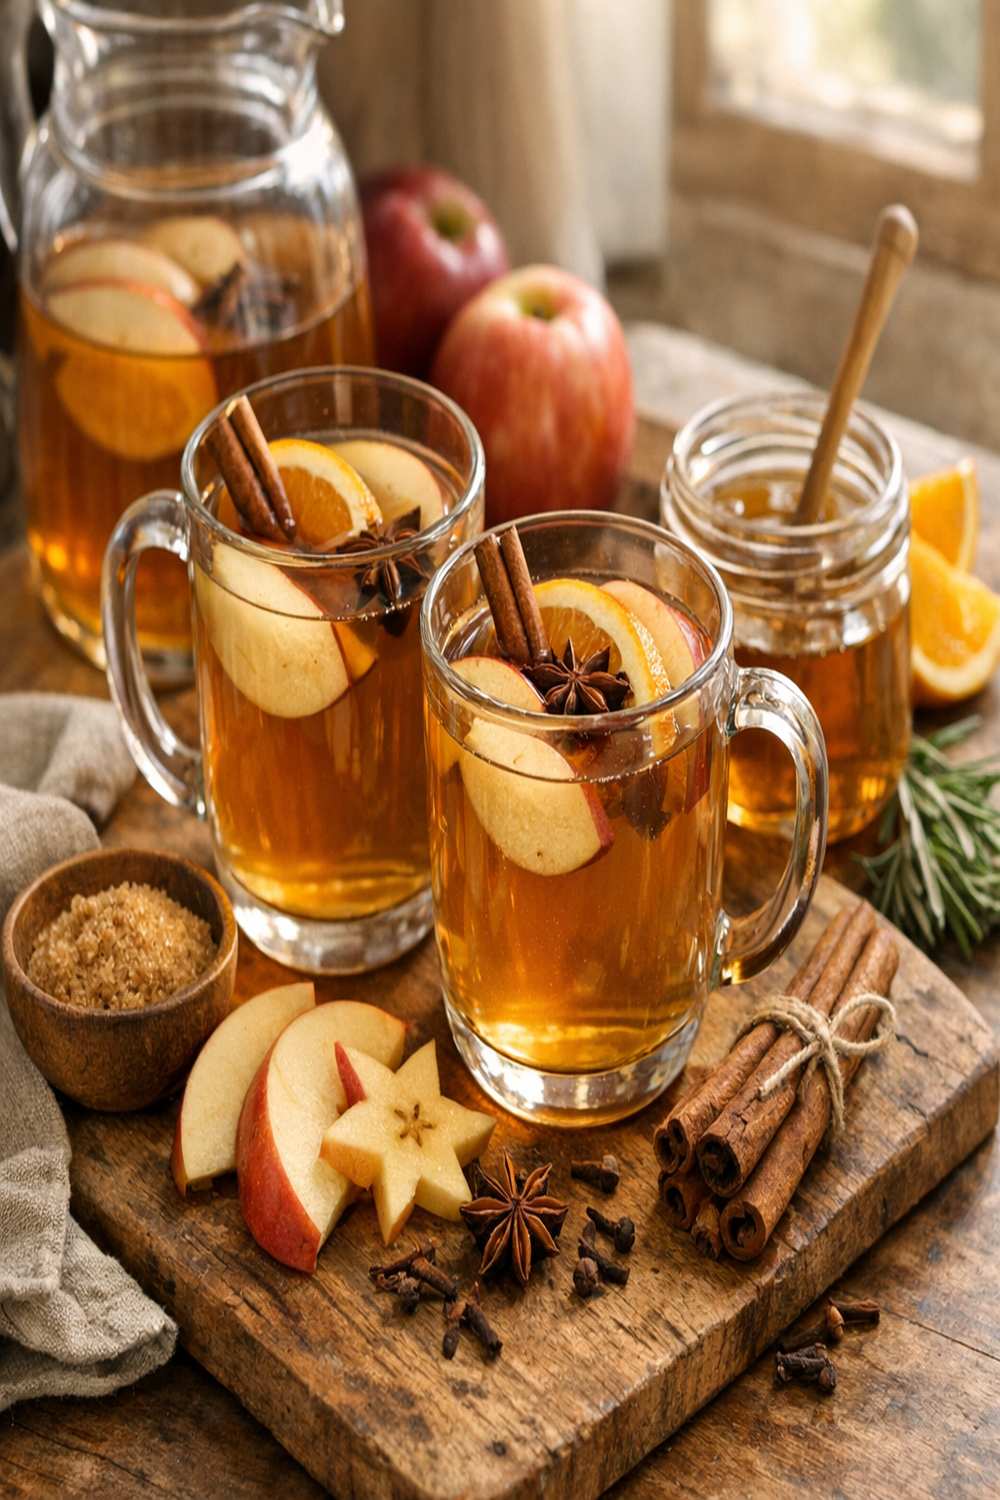
Step 7: Serve Warm and Enjoy
Ladle your fresh cider into mugs or heat-safe glasses and serve it warm. If you’d like to make it feel extra special, add a cinnamon stick as a stirrer or a thin orange slice for garnish. The cider is perfect on its own, or you can serve it alongside seasonal baked goods.

Expert’s Nutritional Tip
As a registered dietitian, I want to highlight something important about the sugar content here. While we’re adding 6 tablespoons of sugar, that amount is relatively modest considering you’re making 8-10 servings of cider. The real magic is that the apples provide most of the natural sweetness through their inherent fruit sugars. This is different from many commercial ciders that add syrups or concentrated sugars.
The skin on the apples also provides fiber and polyphenols—plant compounds with anti-inflammatory properties. By leaving the skins on during cooking, you’re capturing those nutrients in your finished beverage. If you have family members watching their sugar intake, you can reduce the added sugar to 3 or 4 tablespoons and rely more on the fruit’s natural sweetness, though the cider will be less concentrated in flavor.
Tips and Tricks
- Choose Your Apples Strategically – A 50/50 mix of sweet and tart varieties creates the most interesting flavor. Honeycrisp and Fuji apples bring sweetness; Granny Smith and Pink Lady apples add brightness and complexity. Avoid mealy apples like Red Delicious for this recipe.
- Don’t Skip the Orange – It sounds like a small addition, but that citrus really lifts the entire flavor profile and prevents the cider from tasting one-dimensional or overly spiced. It’s the secret ingredient most people overlook.
- Fresh Spices Matter More Than You Think – Check the dates on your cinnamon and cloves. Spices lose their potency over time. If your cinnamon or cloves are more than 6 months old, add a little extra to compensate.
- Use Low Heat When Possible – While high heat will work, low heat extracts flavor more gently and creates a deeper, more nuanced taste. Plan ahead so you can use the slow cooker method.
- Don’t Over-Strain – While I recommend straining twice, don’t force solids through the mesh. You want clear cider, not cloudy. The second straining is about catching particles, not extracting more liquid.
- Taste as You Go – Everyone’s apples are different. Before serving your entire batch, taste a small amount. If you want it sweeter, you can stir in a touch more sugar. If you want more spice, you can add a pinch of ground cinnamon to individual servings.
- Make It Your Own – Some years I add a thin slice of fresh ginger for warmth, or a vanilla pod for creaminess. Experiment with what feels right for your family.
Make-Ahead and Storage Guide
One of my favorite things about this recipe is how beautifully it stores and reheats, making it perfect for meal planning and entertaining.
Refrigerator Storage: Pour your finished cider into clean glass containers or bottles and store in the refrigerator for up to 7 days. The flavor actually deepens slightly after the first day, so don’t be afraid to make it ahead of your gathering.
Freezer Storage: You can freeze cider in freezer-safe containers for up to 3 months. Leave about ½ inch of headspace at the top since liquids expand slightly when frozen. I like to freeze portions in ice cube trays first, then transfer the frozen cubes to freezer bags for easy single-serving thawing.
Reheating: When you’re ready to serve, simply pour your cider into a saucepan and warm it gently over medium heat, stirring occasionally, until it reaches your desired temperature. Don’t boil it, as this can cause flavor loss. Alternatively, reheat in the microwave in 1-minute intervals, stirring between each one, until warm throughout.
Make-Ahead Tip: I often make this recipe on a Sunday afternoon, strain it completely, and let it cool to room temperature. Then I portion it into the refrigerator, and throughout the week, we simply heat individual servings as needed. This way, you get that “fresh cider” experience any time you want it.
Common Mistakes to Avoid
- Using Only One Apple Variety – Resist the temptation to use just Honeycrisp or just Granny Smith. The complexity comes from blending sweet and tart varieties. Single-variety cider tastes one-note.
- Adding Too Much Water – More water means diluted flavor. Stick to just enough to cover the fruit. You want concentration, not a weak beverage that requires hours to develop flavor.
- Skipping the Second Straining – I get it—you want to finish. But that second strain through fine mesh is what separates homemade cider from cloudy apple juice. It takes 5 extra minutes and makes a huge difference in appearance and mouthfeel.
- Cooking on High Heat the Entire Time – While it’s faster, high heat can cause the flavor to become harsh or overly concentrated. If you have time, use low heat. Your taste buds will thank you.
- Forgetting to Remove the Orange Peel Completely – Bits of peel floating in your cider are unpleasant. Take the extra moment to peel thoroughly before adding to the slow cooker.
Can I Store Apple Cider?
Yes, absolutely! This is one of those recipes that actually improves with a bit of storage time, which makes it perfect for busy families and entertaining.
Your finished cider keeps beautifully in the refrigerator for up to 7 days in airtight glass containers or bottles. The flavors meld and deepen during this time, so cider that’s been sitting for 2-3 days often tastes even better than it did on day one.
For longer storage, freeze your cider in freezer-safe containers for up to 3 months. I recommend leaving about ½ inch of headspace since the liquid will expand slightly as it freezes. You can also freeze it in ice cube trays for convenient single-serving portions—just pop a cube into a mug of hot water when you want warm cider quickly.
When reheating, warm gently on the stovetop over medium heat, stirring occasionally, until it reaches the temperature you prefer. Avoid boiling, which can affect the delicate spice flavor. You can also enjoy it cold straight from the refrigerator on warmer days—it’s refreshing and flavorful.
Seasonal Variations
While this recipe is perfect as written for fall, here’s how I adapt it throughout the year:
- Winter Warmth Version (December-January): Add a 1-inch piece of fresh ginger (sliced), a pinch of ground nutmeg, and 1 whole star anise pod. These additions make it feel extra cozy during the cold months. Perfect with holiday gatherings.
- Spring Fresh Version (March-May): Reduce the cinnamon to 2 sticks, add the zest of 1 lemon, and include 2-3 fresh mint leaves. This brightens everything and makes it feel lighter as the weather warms.
- Summer Version (June-August): Serve the cider completely chilled over ice cubes. Add a splash of sparkling water or ginger ale to make it a refreshing mocktail. The spices take on a different character when served cold.
- Tropical Twist: Swap the orange for a pineapple core (cut into chunks, seeds removed). Add 2-3 whole cloves and a small piece of vanilla bean. This creates an unexpectedly delicious version that works year-round.
Nutrition Information
Per 1-cup serving (based on USDA food composition data for fresh apple cider): Approximately 117 calories, 28 grams carbohydrates (with 3 grams dietary fiber), less than 1 gram protein, and 0 grams fat. Each serving contains 21 grams of natural sugars plus approximately 4.5 grams of added sugar from the recipe.
The cider provides good amounts of vitamin C (supporting immune function) and various polyphenols from the apple skins (anti-inflammatory compounds). The cinnamon and cloves add virtually no calories but provide additional antioxidants. This is a whole-food beverage with minimal processing—exactly the kind of drink I recommend to families looking for comfort without excessive added sugars.
What Can I Serve With Apple Cider?
Homemade cider is wonderfully versatile. It pairs beautifully with so many fall and winter treats, creating complete flavor experiences that feel intentional and celebratory.
For afternoon gatherings, I love serving warm cider alongside our Apple Cinnamon Bread Loaf Recipe for a cohesive apple-focused experience. If you’re feeding a crowd and want something handheld, our Autumn Cookie Recipes are perfect alongside steaming mugs.
- Breakfast Pairings: Serve cider warm alongside cinnamon rolls, banana bread, or apple-based pastries. The spiced warmth complements morning baked goods beautifully.
- Afternoon Tea Time: Pair with scones, biscuits, or shortbread. The cider’s natural sweetness means you don’t need sugary treats to feel indulgent.
- After-Dinner Gatherings: Serve warm cider with chocolate desserts, apple-based cakes, or buttery cookies. It aids digestion and creates a sense of closure to a meal.
- Cold Beverage Option: Chill it completely and serve over ice at summer gatherings, or dilute it slightly with sparkling water for a refreshing mocktail.
- Breakfast Smoothie Base: Cool cider can become the liquid base for fall-flavored smoothies, blended with yogurt and frozen banana for something completely different.
- Cooking Ingredient: Use leftover cider to braise pork, glaze ham, or sweeten the filling for apple desserts. It brings depth to savory cooking.
Substitutes and Ingredient Swaps
- Apple Variety Swaps: If Honeycrisp or Granny Smith aren’t available, use any combo of sweet varieties (Fuji, Gala, Pink Lady) with tart varieties (Braeburn, Cortland). The key is balance, not specific varieties.
- Cinnamon Stick Alternative: If you only have ground cinnamon, use 1 tablespoon, but understand the flavor will be slightly more intense and distributed differently. You might want to strain through cheesecloth to catch particles.
- Orange Substitution: Lemon provides similar brightness if oranges aren’t available. Use 1 large lemon, peeled and segmented. Apple cider made with lemon is actually delicious—different but equally valid.
- Clove Reduction: If you’re sensitive to or dislike clove flavor, reduce to ½ teaspoon. It’s a dominant spice, and personal preference matters here.
- Sugar Alternatives: You can use honey or maple syrup instead of granulated sugar in equal measure by weight. These add slight flavor variations—honey adds floral notes, maple adds earthiness. Use the same 75 grams measurement.
- Slow Cooker Alternative: If you don’t have a slow cooker, you can make this on the stovetop in a large pot over very low heat, covered, for 2-3 hours, though you’ll need to monitor it more closely and stir occasionally.
- Water Variation: If you have apple juice on hand, you can use it to replace half the water for a more concentrated apple flavor, though this isn’t necessary—the fresh apples provide plenty.
Apple Cider Recipe
Ingredients
Method
- Start by thoroughly rinsing your orange under cool running water and gently scrubbing it with a clean brush to remove any residue. Using your fingers or a small paring knife, peel away the orange skin in thick strips, leaving as much of the bitter white pith behind as possible. Separate the orange into individual segments and place them directly into your slow cooker (a 4-quart or larger capacity). The orange segments will become soft and will help create a natural sweetness and brightness to your cider. I typically let them sit here for a minute while I prepare the apples—there's no rush.

- Rinse all 10 apples thoroughly under running water and pat them dry with a clean kitchen towel. This simple step prevents any dirt or residue from getting into your cider. Working over the slow cooker (to catch any juices), cut each apple into quarters, removing the core as you go. You can discard the cores, seeds, and stems—they're not needed. Don't peel the apples; the skin adds valuable color, nutrients, and tannins that contribute to the complex flavor profile. The apple pieces should tumble into the slow cooker on top of your orange segments. You'll see the fruit start to glisten almost immediately, which is a beautiful sign.

- Nestle the cinnamon sticks into the fruit mixture (or sprinkle ground cinnamon if using). Add your ground cloves—this is where the magic begins. You'll immediately smell that warm, aromatic spice beginning to release. Sprinkle the granulated sugar evenly over everything. If you're using optional nutmeg and star anise, add those now. Stir gently with a long spoon to distribute the sugar and spices throughout the fruit.

- Pour filtered water over the fruit mixture until it's just barely covered—you want the fruit sitting in liquid, but you don't need excess water, as the apples will release their own juice during cooking. This typically requires 8 to 10 cups of water, but add gradually and look for that "just covered" point. Cover your slow cooker with the lid and set it to low heat for 6 to 7 hours (or high heat for 4 hours if you're short on time). Low and slow is my preference because it gently extracts flavor without concentrating it too intensely. As it cooks, your kitchen will fill with the most incredible aroma—cinnamon, cloves, apples, and orange melding into something completely irresistible. Resist the urge to open the lid constantly, though it's tempting!

- After 6 to 7 hours on low (or 4 hours on high), open your slow cooker carefully—the steam will be fragrant and hot. The apples should be completely soft and almost falling apart. Using tongs or a large slotted spoon, carefully remove the cinnamon sticks and set them aside on a clean plate. Using a sturdy spoon or a potato masher, gently press down on the fruit to break it apart and release more of its juices into the liquid. You're not making applesauce here—just crushing things enough to increase extraction. Return those cinnamon sticks to the pot, place the lid back on, and cook for 1 additional hour on low or high heat.

- This is where patience pays off. Position a large pot or heat-safe pitcher near your slow cooker. Set a fine mesh strainer over the top of your pot. Working slowly and carefully (the cider will be hot), pour the contents of your slow cooker through the strainer. You'll hear the liquid draining and see the solids—the pulp, skins, and flesh—collecting in the strainer. Let it drain completely; don't force anything through. This will take several minutes. Once the majority has drained, you can gently press the solids with the back of a spoon to extract just a bit more liquid, but don't over-process this. Discard all the solids. Now comes the second straining, which is the professional touch that makes your cider crystal clear: pour the cider through a fine mesh strainer one more time, working slowly to catch any remaining pulp particles. Your finished cider should be a beautiful deep amber or golden color.

- Ladle your fresh cider into mugs or heat-safe glasses and serve it warm. If you'd like to make it feel extra special, add a cinnamon stick as a stirrer or a thin orange slice for garnish. The cider is perfect on its own, or you can serve it alongside seasonal baked goods.

Notes
FAQs
Can I make apple cider without a slow cooker?
Absolutely! Combine all ingredients in a large stainless steel pot with a lid. Bring to a boil over medium-high heat, then immediately reduce to the lowest setting and cover. Simmer for 2-3 hours, stirring occasionally, until the apples are completely soft. The timing is shorter because direct stovetop heat is more intense than a slow cooker. Watch carefully so the mixture doesn’t burn on the bottom—this is why I prefer the slow cooker method for easier results. Once the apples are soft, proceed with mashing and straining exactly as written.
What if my cider turns out too sweet or too tart?
You can adjust after the fact! If it’s too sweet, add a tablespoon of fresh lemon juice and stir well. The acidity balances sweetness beautifully. If it’s too tart, stir in a teaspoon of honey or a tablespoon of sugar dissolved in a small amount of warm water. Remember that cold cider tastes less sweet than warm cider, so taste it at the temperature you plan to serve it. You might be surprised at how your perception changes.
Can I use store-bought apple juice instead of fresh apples?
While you technically can, I wouldn’t recommend it for your first batch. The beauty of this recipe is using fresh whole apples, which provide complexity, fiber, and genuine flavor that processed juice can’t match. Store-bought juice is also already pasteurized, so simmering it won’t add the same depth. If you’re in a pinch, you could use fresh-pressed cider (the kind from a farmers market) instead of whole apples—use about 10-12 cups—but fresh apples are always superior.
Is homemade cider safe if I have young children?
Yes, completely safe. This cider is made at a temperature (170-180°F) that destroys harmful pathogens, and it’s shelf-safe for storage when kept refrigerated. The low pH (due to the apples and orange) also makes it an inhospitable environment for bacterial growth. Just follow proper storage guidelines—keep it refrigerated and discard any cider that smells off or shows signs of fermentation (fizz, visible bubbles).
Why is my cider cloudy instead of clear?
This usually means the second straining wasn’t thorough enough, or you pressed solids too hard through the mesh. Cloudy cider tastes fine but looks less appetizing. For clearer cider next time, pour more slowly through each strainer and don’t force anything through. You can also line your fine mesh strainer with cheesecloth for an extra-fine filtration. Alternatively, some people actually prefer slightly cloudy cider because it contains more suspended solids and nutrients—it’s just a matter of preference.
Can I drink the cider while it’s still warm in the slow cooker?
Yes, but I’d recommend at least doing the initial straining first so you’re not drinking around soft apple pieces. You can do an initial rough strain right into a heat-safe pitcher and serve from there while continuing your second, more thorough straining. Some families actually love the rustic appeal of slightly chunky cider, so this is another preference thing—there’s no wrong answer.
More Recipes You’ll Love
- this fruit cobbler – A warm, fruit-forward dessert that celebrates seasonal produce the same way this cider does
- my go-to banana bread – Another slow-baked favorite featuring warm spices that pair beautifully with fresh cider
- these homemade cookies – A perfect handheld companion for your cider-sipping gatherings
- this simple cake – A fall-flavored dessert that shares cider’s warm, comforting spice profile
Making homemade apple cider brings me right back to that October afternoon with my kids and their dirt-covered hands. It’s a recipe that connects us to the seasons, to fresh food, and to those moments when a warm mug creates space for real connection. Whether you’re making it for a crowd or for cozy weeknight sipping, I hope this cider fills your kitchen with that same warmth and possibility.
The beauty of this recipe is that it meets you where you are—whether you have hours to simmer on low or need faster high-heat cooking, whether you want it spiced boldly or gently, whether you’re serving it to a house full of guests or stealing quiet moments for yourself. Make it your own, trust your instincts, and enjoy every warm, spiced sip.
Happy cooking!
META DESCRIPTION: Homemade apple cider recipe made easy in a slow cooker. Fresh apples, warm spices, naturally sweet. Perfect for fall gatherings and cozy family moments.