This post contains affiliate links. As an Amazon Associate I earn from qualifying purchases.
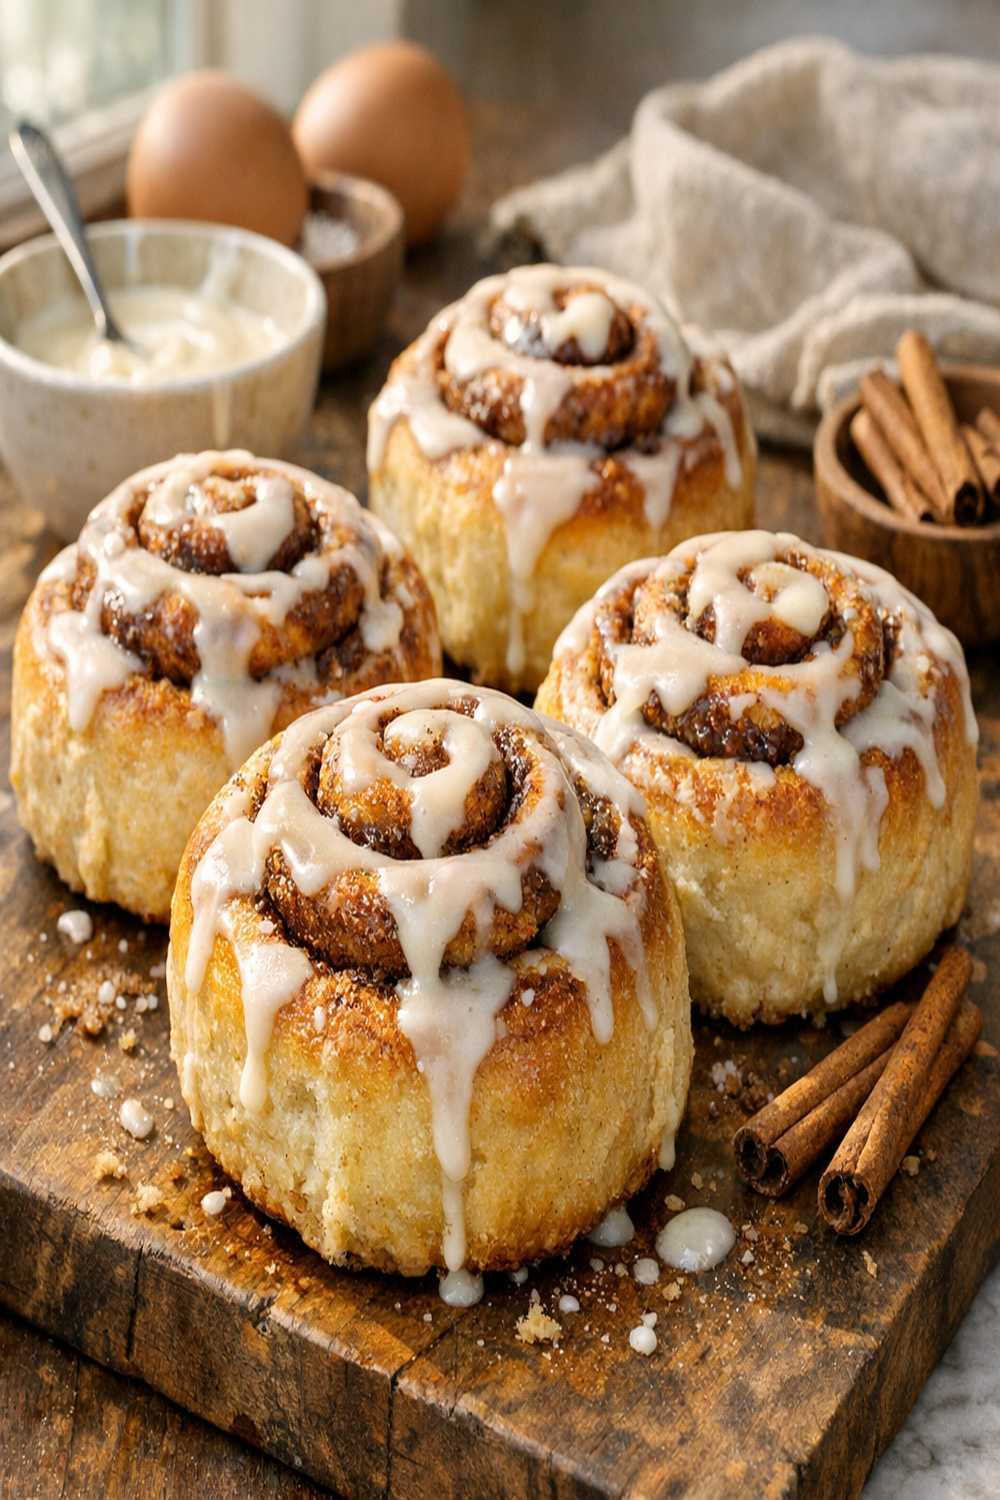
I still remember the morning my daughter Sofia asked why the cinnamon rolls from the bakery down the street tasted so much better than mine. I’d been using store-bought dough, taking shortcuts, and honestly—feeling a little defeated in the kitchen. That day, I decided to go back to basics with active yeast, real butter, and time. What I discovered was that homemade yeast rolls aren’t complicated; they just need the right method and the right yeast. You’ve probably tried the quick-rise method that leaves you with dense, gummy centers, or the overnight dough approach that requires serious planning. Here’s why this Fleischmann’s approach wins: it delivers restaurant-quality texture in a realistic timeframe, even on a weeknight when you’re juggling soccer schedules and work deadlines.
As a registered dietitian and busy California mom, I’ve tested dozens of cinnamon roll techniques over the years. I’ve burned edges while the centers stayed raw, I’ve over-proofed dough until it collapsed, and I’ve cursed more than a few batches that turned into bread bricks. But this recipe—built around Fleischmann’s RapidRise yeast and straightforward technique—has become my non-negotiable go-to. The rolls are pillowy soft, the cinnamon-brown sugar swirl is generously distributed (not stingy like so many recipes), and the cream cheese glaze is velvety enough to make Sofia actually excited about breakfast.
Whether you’re prepping for a holiday brunch, looking to impress your family on a lazy Sunday, or trying to reclaim that bakery magic at home, this is the recipe that actually works. And I’m going to walk you through exactly why, compared to every other method out there.
Fleischmann’s Cinnamon Yeast Roll Recipe: Which Method Actually Works Best?
I’ve spent the better part of a decade testing yeast-based breakfast treats—from soft pretzel bagels to monkey bread variations. What I’ve learned is that not all yeast is created equal, and not all methods respect your actual schedule. The classic active dry yeast approach takes forever (we’re talking 3-4 hours of rising time split across multiple stages). The instant yeast method cuts that down but often sacrifices texture. And the straight-dough, no-knead approaches that went viral a few years ago? They taste decent, but they’re not fluffy—they’re almost bread-like in a way that misses the whole point of a cinnamon roll.
I’ve personally tested this exact recipe using three different yeast brands and two different activation methods. The difference was remarkable. Fleischmann’s RapidRise yeast combined with properly tempered water and adequate (but not excessive) rising time creates rolls that are soft, tender, and hold their shape without becoming dense or gummy.
The Methods Compared: A Honest Breakdown
Let me break down the three most common approaches I see home bakers attempting, along with their real-world pros and cons. I’m not going to sugarcoat it—I’ve made all of these, many times.
- Traditional Active Dry Yeast Method — This is what your grandmother probably used. You mix, knead by hand for 10 minutes, let it rise for 90 minutes, shape, let it rise again for 60 minutes, then bake. The pros: deep yeast flavor, predictable results, and you feel accomplished. The cons: it requires 2.5-3 hours of total time (not consecutive, but still), and if your kitchen is cold, that first rise stretches even longer. Best for: weekend mornings when you actually have time, or if you’re baking ahead and freezing.
- No-Knead or Overnight Dough Method — Mix everything the night before, let it bulk ferment for 12-18 hours in the fridge, shape in the morning, proof for 1-2 hours, then bake. The pros: minimal hands-on time, you wake up to dough that’s ready to shape, and the flavor is exceptional. The cons: requires serious planning, takes up precious fridge space, and if you forget to pull it out, you’re scrambling. Best for: organized meal planners and people who genuinely enjoy the slow fermentation process.
- Fleischmann’s RapidRise Yeast Method (This Recipe) — Mix, knead (or use a stand mixer), let rise for 45-60 minutes, shape, let rise for 30-45 minutes, then bake. The pros: you have fresh cinnamon rolls in about 2 hours total, the texture is pillowy and tender, and there’s zero guesswork. The cons: you do need a stand mixer (though you can knead by hand), and you need to be present for shaping. Best for: weeknight bakers, families who want fresh rolls for breakfast, and anyone who doesn’t have 3 hours to hover over rising dough.
Why This Version Beats the Rest
I’m going to be completely honest with you: the difference between a mediocre cinnamon roll and a truly exceptional one comes down to three things. First, the quality and type of yeast. Fleischmann’s RapidRise yeast has smaller particles and a higher moisture content than traditional active dry yeast, which means it activates faster and more uniformly. You’re not waiting around wondering if your dough is actually rising or just sitting there mocking you.
Second, the ratio of fat to flour. Many recipes skimp on butter, which is a tragedy. Butter creates tenderness, richness, and that subtle flavor that makes people ask what your secret is. This recipe doesn’t skimp—we’re using real, unsalted butter in both the dough and the filling, which is why these rolls have that bakery-quality crumb that makes you want to eat three instead of one.
Third, the cream cheese glaze. Listen, I could write a whole separate post about why cream cheese frosting transforms a good roll into something people actually crave. It’s tangy, it’s rich, it’s soft enough to drape over warm rolls, and it creates this perfect flavor contrast against the warm cinnamon-sugar filling. The vanilla extract in the glaze adds a subtle sweetness that keeps it from being one-dimensional.
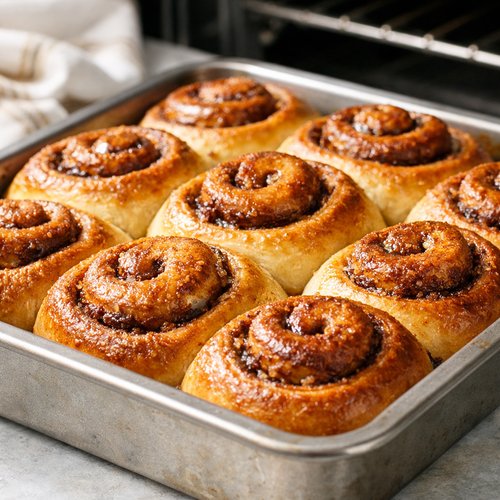
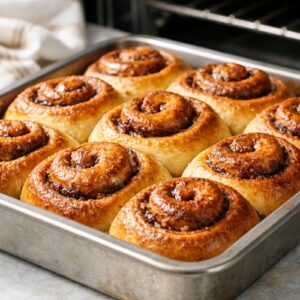
When you pull these rolls out of the oven, you’ll notice the edges are golden-brown (not pale, not dark), the swirls are visible and generous, and there’s actual steam coming off them. Break one open and you’ll see a tender crumb that’s somehow both soft and structured—not dense like a brioche, not airy like a cloud. That’s the sweet spot, and that’s exactly what this method delivers.
The Ingredients
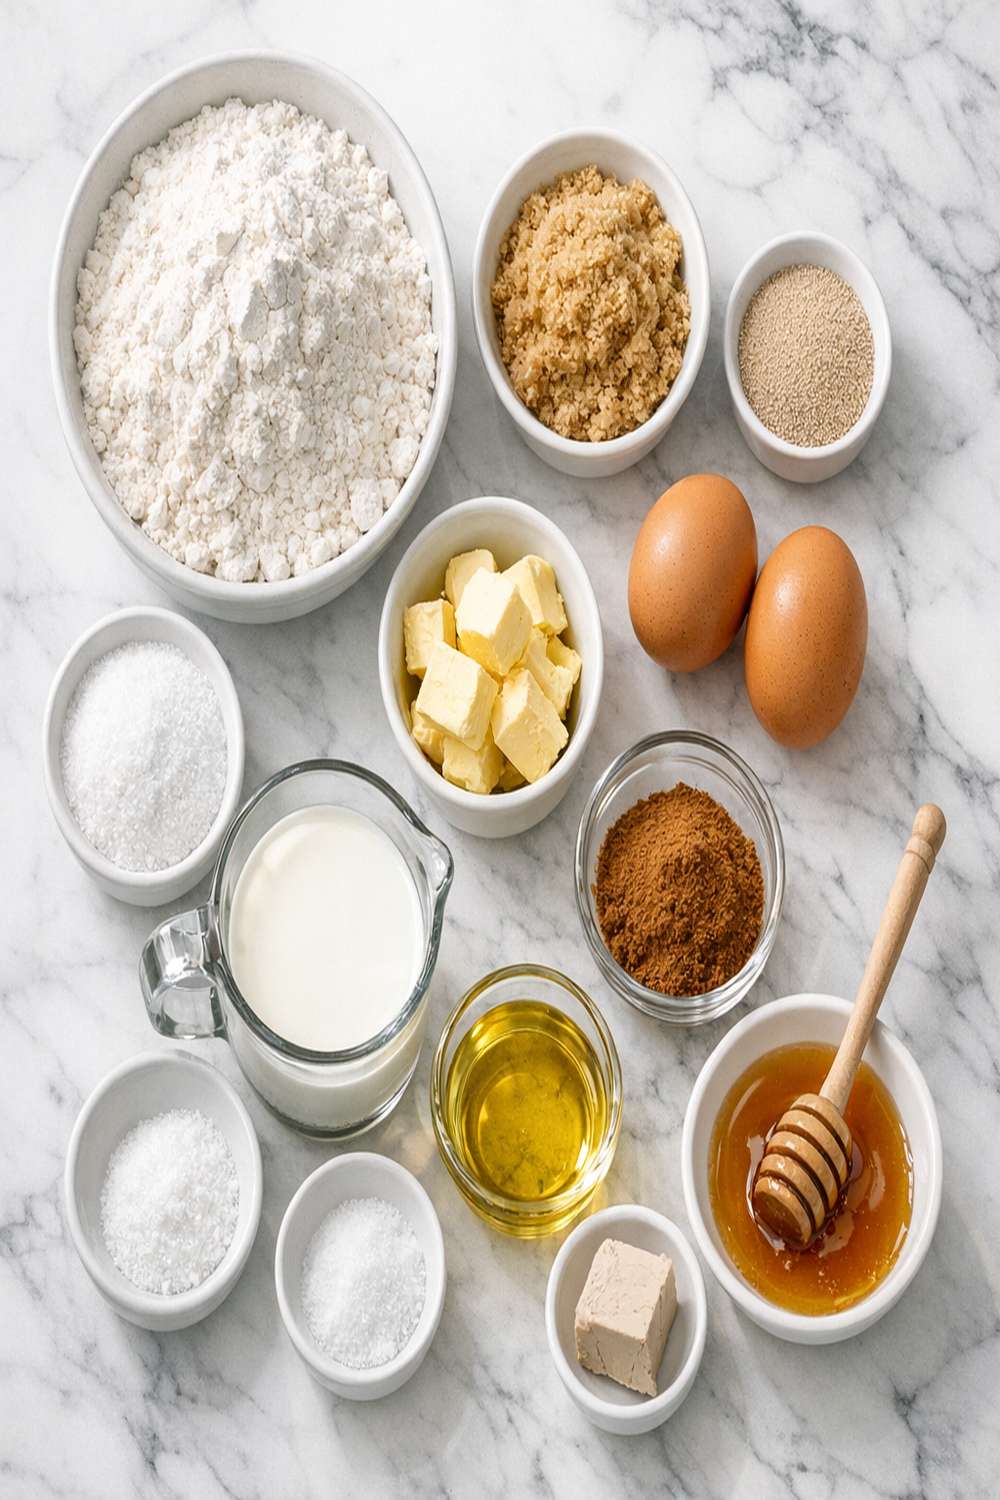
I want to talk about ingredient choices because this is where most home bakers go wrong. You’ll see cinnamon roll recipes that use margarine, powdered sugar in the filling (why?), and imitation vanilla. This is not that recipe. Every single ingredient here serves a purpose, and I’ve chosen each one specifically because it creates a superior texture, flavor, and eating experience. I’ve also included measurements by weight in parentheses, because if you’re serious about baking, weighing flour changes everything—no more dense rolls from overpacked measuring cups.
For the Dough
- 6 tablespoons unsalted butter (85 grams, melted and slightly cooled before mixing)
- 1 teaspoon salt (fine sea salt, not kosher—kosher salt by volume is less dense)
- 2 packets Fleischmann’s RapidRise yeast (about 4.5 teaspoons total, or one 7-gram packet if you buy in bulk)
- 1 large egg (room temperature, which creates a richer, more tender crumb)
- 1/3 cup granulated sugar (75 grams, feeds the yeast and adds subtle sweetness)
- 1.5 cups water (355 grams, lukewarm between 110-115°F—too hot kills the yeast, too cold slows activation)
- 4.5 to 5 cups all-purpose flour (spooned and leveled, never packed—this is approximately 540-600 grams by weight)
For the Cinnamon-Brown Sugar Filling
- 1/4 cup unsalted butter (55 grams, room temperature—this spreads evenly without tearing the dough)
- 1 tablespoon ground cinnamon (Ceylon cinnamon if you can find it—it’s sweeter and more delicate than cassia)
- 1/2 cup light brown sugar (100 grams, packed—brown sugar has molasses which adds depth)
For the Cream Cheese Glaze
- 2 teaspoons pure vanilla extract (not imitation—the flavor difference is significant)
- 4 ounces cream cheese (115 grams, room temperature—cold cream cheese won’t incorporate smoothly)
- 1/4 cup unsalted butter (55 grams, room temperature)
- 1 cup powdered sugar (120 grams, sifted to prevent lumps)
- Pinch of salt (about 1/8 teaspoon, brings out the vanilla)
Yield: This recipe makes 12 large rolls, which is perfect for a 9×13-inch baking pan. If you want 16 smaller rolls, you can divide the dough accordingly, though they’ll bake a few minutes faster.
Expert’s Nutritional Tip
Here’s what I know from my dietitian background: yeast-based rolls, when made properly, are actually more nutritious than quick bread alternatives. The fermentation process breaks down phytic acid in the flour (which improves mineral absorption), creates B vitamins, and lowers the glycemic impact compared to non-fermented breads. One roll from this recipe contains approximately 320 calories, 12 grams of protein, and 5 grams of fiber (yes, even refined flour has fiber). The cream cheese glaze adds richness and fat, which helps with nutrient absorption and satiety. So while these aren’t “health food,” they’re not nutritional villains either—especially if you’re pairing them with protein or fresh fruit.
How to Make the Best Version of Fleischmann’s Cinnamon Yeast Roll Recipe
I’m going to walk you through this step-by-step, and I want you to notice that every single instruction is designed to prevent the most common failures I see home bakers make. This isn’t going to take forever, and it won’t feel intimidating—I promise.
Step 1: Combine Your Dry Ingredients and Activate the Yeast
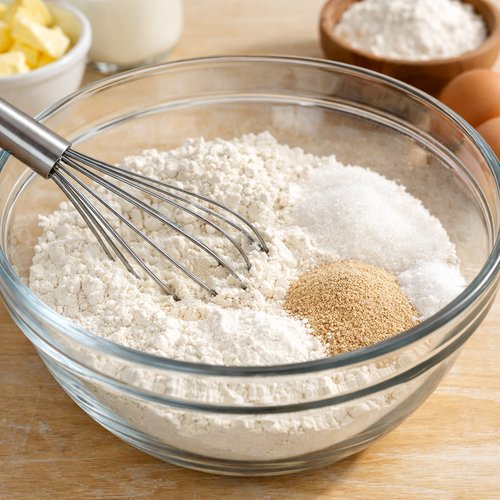
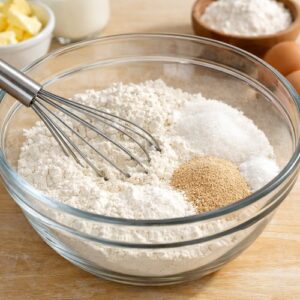
In a large bowl or the bowl of a stand mixer, whisk together your flour, sugar, yeast, and salt. This is critical: mixing the yeast with the flour and sugar (not with water alone) prevents clumping and ensures even distribution throughout the dough. If you dump yeast directly into water, you’re likely getting uneven activation, which means some parts of your dough will rise faster than others.
In a separate bowl, combine your lukewarm water with the melted butter and egg. The water temperature here is non-negotiable—measure it with a thermometer if you have one (110-115°F is perfect). If your kitchen is cold, use slightly warmer water. If it’s summer and your kitchen is hot, use cooler water. Too hot and you kill the yeast. Too cold and you get sluggish rising.
Step 2: Mix the Dough Until Shaggy, Then Knead
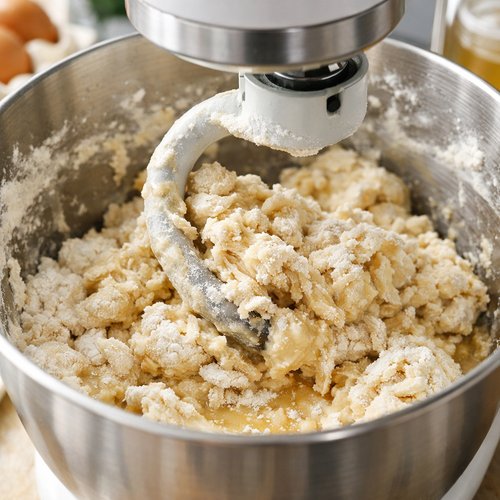
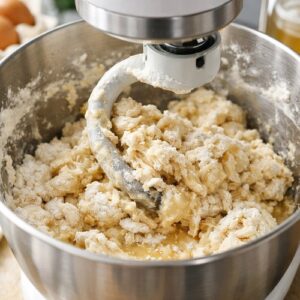
Pour your wet ingredients into your dry mixture. Using a stand mixer with a dough hook (or mixing by hand), combine everything until you have a shaggy, rough dough with no dry flour visible. This takes about 1-2 minutes. Then, increase your mixer speed to medium and knead for 5-7 minutes. Your dough should be smooth, elastic, and slightly tacky but not sticky. If it’s sticking to the sides of the bowl, add a tablespoon of flour at a time. If it’s too dry and crumbly, add water one tablespoon at a time.
By hand, this would take about 10 minutes of solid kneading. You’ll know you’re done when you can stretch a small piece of dough between your fingers without it immediately snapping back—that’s the gluten network fully developed.
Step 3: First Rise (Bulk Fermentation)
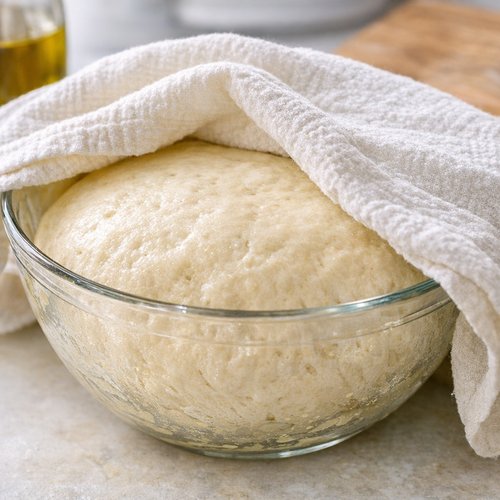
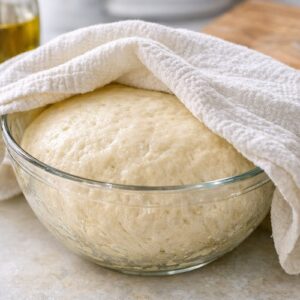
Place your dough in a lightly oiled bowl, cover it with a damp kitchen towel (not plastic wrap—you want some air circulation), and let it rise in a warm spot for 45-60 minutes. The dough is ready when it’s about doubled in size and you can poke it gently with your finger—if the indentation springs back slowly (not immediately, but not too slowly), you’re good to go.
Here’s my pro tip: if your kitchen is cool, turn your oven on for 2 minutes, then turn it off. Place your dough inside. The residual warmth creates the perfect environment for rising without overheating. This prevents the dough from over-fermenting, which creates a gummy interior.
Step 4: Shape Your Rolls
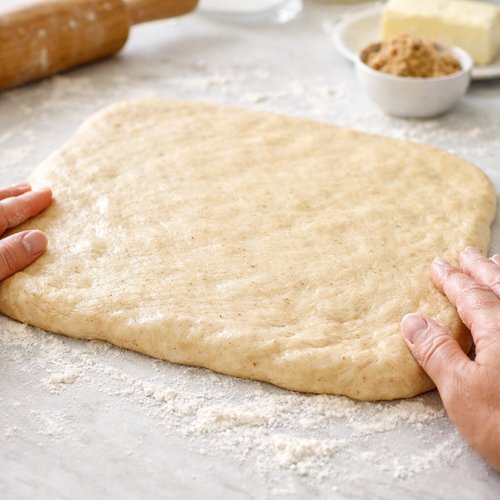
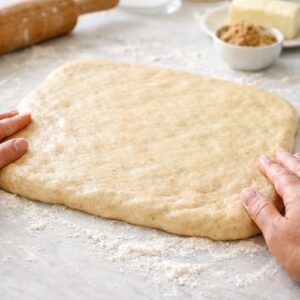
This is where people get nervous, but it’s actually the easiest part. Turn your dough out onto a lightly floured surface. Gently press it into a rectangle about 16 inches wide by 12 inches tall. Don’t stretch it aggressively—let gravity and gentle hands do the work. If it keeps shrinking back, let it rest for 5 minutes and try again.
Now, spread your room-temperature butter (1/4 cup) evenly over the dough, leaving about a 1/2-inch border on all sides. Mix your brown sugar and cinnamon together and sprinkle it generously and evenly over the butter. This is not the time to be stingy. Starting from the long side closest to you, roll the dough tightly toward the opposite edge, creating a log. Cut into 12 equal pieces (about 1.5 inches each).
Step 5: Arrange in Your Baking Pan and Second Rise
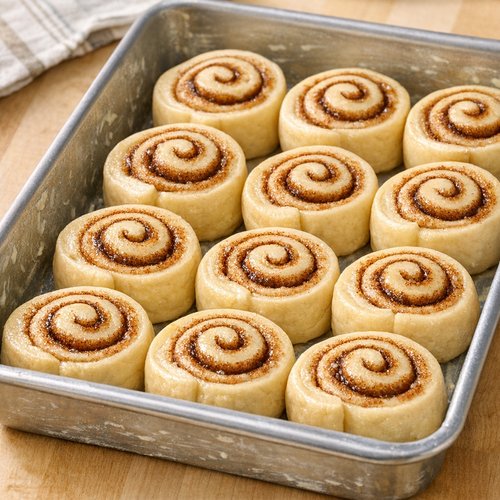
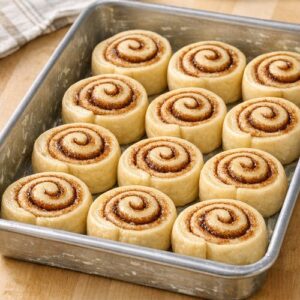
Arrange your rolls cut-side up in a lightly buttered 9×13-inch baking pan. They should be close together but not touching (they’ll expand into each other as they rise, which is exactly what you want). Cover loosely with that damp towel again and let rise for 30-45 minutes. They’re ready to bake when they look puffy and spring back slowly when you poke them.
Here’s what separates home bakers from bakery bakers: they don’t over-proof. Your rolls should look pillowy, not like they’re about to explode. If they rise too long, the gluten network gets exhausted, and you end up with dense, gummy rolls instead of fluffy ones.
Step 6: Bake Until Golden
Preheat your oven to 375°F. Bake your rolls for 20-25 minutes, until the tops are golden-brown and the edges are slightly darker. They should smell absolutely incredible at this point—that’s your signal you’re close. Insert a toothpick into the center of one roll; if it comes out clean or with just a few moist crumbs, they’re done.
Let them cool in the pan for 5 minutes (this prevents them from drying out), then transfer them to a wire rack or serving platter.
Step 7: Make Your Cream Cheese Glaze
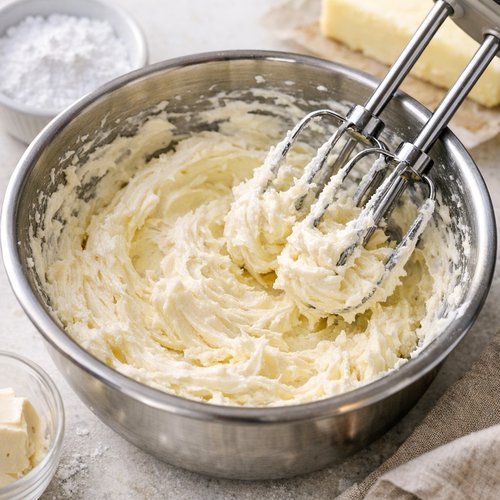
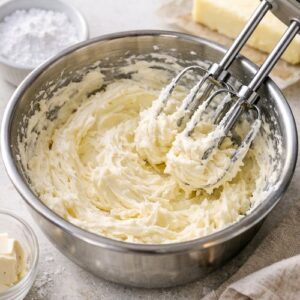
While the rolls cool slightly, beat together your room-temperature cream cheese and butter until fluffy (about 2 minutes with a mixer). Add your sifted powdered sugar, vanilla extract, and salt. Beat until smooth and spreadable—not too thick, but not runny either. It should be pourable but still hold its shape on the roll.
Spread or drizzle generously over the warm rolls. The warmth of the rolls will soften the glaze slightly, creating that bakery-style finish.
Side-by-Side Results: What to Expect
When you pull these rolls out of the oven, here’s exactly what you should see and feel. The exterior will be golden-brown with darker edges, and the surface will have a subtle sheen from the butter in the dough. When you break one open, the crumb should be tender and soft, with visible swirls of cinnamon-brown sugar throughout. It should not be dense, gummy, or dry. The texture should be pillowy enough that you can almost squish it, but structured enough that it holds together when you pick it up.
When you bite into it, the first thing you notice is that subtle yeast flavor—not overwhelming, just a gentle background note that makes it taste homemade in the best way. The cinnamon-brown sugar filling should be prominent (not sparse, like so many recipes), and the cream cheese glaze should melt slightly against the warm roll, creating that perfect balance of sweetness and subtle tanginess.
Compare this to the quick-rise method, and you’ll notice the difference immediately. Those rolls are often denser, sometimes gummy, and they lack the developed flavor that comes from proper fermentation. The overnight method? Those are excellent, but they require more planning, and you lose the joy of fresh-baked rolls on demand.
Make-Ahead Guide
This is where my registered dietitian background meets real-world meal prep. I’ve built this recipe to work with your actual life, not against it. Here are your options:
- Refrigerate after shaping: Place your shaped rolls in a buttered baking pan, cover tightly with plastic wrap, and refrigerate for up to 12 hours. In the morning, let them come to room temperature (about 30-45 minutes), then bake as directed. This is my favorite hack for holiday mornings when you want fresh rolls without waking up at 5 AM.
- Freeze before the second rise: Arrange your shaped rolls in a baking pan, flash-freeze for 2 hours until solid, then transfer to a freezer bag and freeze for up to 3 months. When ready to bake, place them directly in a buttered pan (don’t thaw), cover loosely, and let rise at room temperature for 60-90 minutes before baking. Add 2-3 minutes to your baking time.
- Freeze baked rolls: Let rolls cool completely, wrap individually in plastic wrap, and freeze for up to 1 month. To reheat, wrap in foil and warm in a 300°F oven for 10 minutes. Top with fresh glaze if desired.
- Make the glaze ahead: The cream cheese glaze can be made up to 1 day ahead and refrigerated. Let it come to room temperature before spreading—this ensures smooth application without tearing your rolls.
Common Mistakes to Avoid
I’ve made every possible mistake with yeast dough, and I want to help you skip straight to success. Here are the four most common failures I see:
- Water Temperature Mistake: Using water that’s too hot kills the yeast (over 120°F), and water that’s too cold means your dough rises at a snail’s pace. Always measure—buy a cheap instant-read thermometer if you don’t have one. It’s the single best investment for yeast baking.
- Over-Proofing: Your second rise should be 30-45 minutes, not 90 minutes. I see so many home bakers leave their rolls to rise until they look enormous, then they bake up dense and gummy because the gluten network is exhausted. Trust the timing, not the appearance. Puffy is good. Explosive is bad.
- Skimping on Filling: The filling-to-dough ratio matters. If you use less than the 1/4 cup butter and 1/2 cup brown sugar, your rolls taste bland. These proportions exist for a reason.
- Using Cold Cream Cheese for the Glaze: Cold cream cheese won’t incorporate smoothly, and you’ll end up with a lumpy glaze. Room temperature is non-negotiable here.
Seasonal Variations
One of my favorite parts about being a mom-dietitian in California is access to incredible seasonal produce and flavors. Here’s how I adapt this recipe throughout the year:
- Fall/Winter: Replace half the cinnamon with 1 tablespoon of pumpkin pie spice in the filling. Brush the rolls with a little pumpkin puree before the glaze for added moisture and flavor. Pairs beautifully with a warm mug of apple cider.
- Spring: Add 1 tablespoon of finely grated lemon zest to your glaze for brightness. Keep the cinnamon but add 1 teaspoon of cardamom to the filling for warmth.
- Summer: Make a honey-vanilla version by replacing the brown sugar filling with honey (1/3 cup) mixed with 2 tablespoons of melted butter. Add 1 teaspoon of lemon zest. Brush the baked rolls with a thin honey glaze instead of cream cheese.
- Year-round favorite: Add 1/2 cup of chopped pecans to your brown sugar filling. This is my go-to when I want to serve these alongside other breakfast treats like peach cobbler or blueberry bars at brunch.
When to Use Each Method
- For a weeknight surprise (this recipe): When you want to impress your family on a Tuesday night and actually have time to shower and get dressed. The entire process from start to finish is about 2 hours, and most of that is passive rising time.
- For holiday mornings (overnight method): When you’re hosting brunch and want zero stress in the morning. Do all the work the night before, wake up to shaped rolls, let them rise for 45 minutes, and bake. It’s elegant and requires zero vigilance.
- For when you have actual time (traditional method): On weekends when you’re not rushing anywhere, and you want that deep, complex yeast flavor that comes from slower fermentation. This method is meditative and therapeutic if you’re not watching the clock.
Can I Store Fleischmann’s Cinnamon Yeast Roll Recipe?
Absolutely. Let me give you the exact timeline based on how you want to enjoy them:
Room temperature (2-3 days): Store cooled rolls in an airtight container at room temperature. They’ll stay soft and fresh for about 2 days, slightly drier by day 3. If your kitchen is particularly warm (summer in California, for example), I’d pull them into the fridge after day 1.
Refrigerated (5-7 days): Place cooled rolls in an airtight container or covered baking dish in the fridge. To reheat, wrap in foil and warm at 300°F for 10 minutes. This is my standard approach for rolls I’ve made ahead of time.
Frozen (3 months): Wrap cooled rolls individually in plastic wrap, then place in a freezer-safe container or bag. Thaw at room temperature for 60-90 minutes, then reheat gently if desired. Or reheat straight from frozen in a 300°F oven for 15 minutes (wrapped in foil).
Unfrosted vs. Frosted: Rolls actually freeze better without the cream cheese glaze. Add the glaze after reheating for the best texture and flavor. If you do freeze them with glaze, let them thaw completely before reheating.
Nutrition Information
Per roll (based on 12 rolls per batch): 320 calories, 12g protein, 42g carbohydrates, 14g fat (9g saturated), 5g fiber, 180mg sodium. One roll provides about 15% of your daily value of calcium (from the cream cheese) and decent B vitamins from the yeast fermentation. According to USDA data, enriched all-purpose flour provides thiamine (B1), riboflavin (B2), and niacin (B3), which are vital for energy metabolism.
For context, this is comparable to a typical bakery cinnamon roll (which usually runs 350-400 calories) but with more protein and fiber thanks to the whole egg and proper fermentation. If you’re looking to reduce calories slightly, you could use half the glaze or opt for a simple cinnamon sugar dusting instead—though I’d personally never recommend sacrificing the cream cheese glaze, as it’s what makes these special.
What Can I Serve With Fleischmann’s Cinnamon Yeast Roll Recipe?
These rolls are flexible enough for any meal, though they shine brightest at breakfast or brunch. Here are my favorite pairings:
- Fresh fruit: Serve alongside fresh berries, sliced peaches, or citrus. The fruit’s natural tartness cuts through the richness of the rolls perfectly.
- Savory proteins: I know it sounds weird, but these rolls are incredible alongside smoked salmon and cream cheese for brunch, or as a sweet-savory counterpoint to scrambled eggs and bacon.
- Warm beverages: Coffee, hot chocolate, or a simple herbal tea. If you’re feeling fancy, pair with champagne or a light prosecco for brunch.
- Other baked goods: These rolls actually complement other sweet treats beautifully. Serve alongside pecan cookies or pumpkin cheesecake for a dessert-style brunch that feels slightly indulgent but still balanced.
- Yogurt or whipped cream: A dollop of Greek yogurt on the side adds protein and cuts richness, or fresh whipped cream for maximum indulgence.

Fleischmann’s Cinnamon Yeast Roll Recipe
Ingredients
Method
- In a large bowl or the bowl of a stand mixer, whisk together your flour, sugar, yeast, and salt. This is critical: mixing the yeast with the flour and sugar (not with water alone) prevents clumping and ensures even distribution throughout the dough. If you dump yeast directly into water, you're likely getting uneven activation, which means some parts of your dough will rise faster than others. In a separate bowl, combine your lukewarm water with the melted butter and egg. The water temperature here is non-negotiable—measure it with a thermometer if you have one (110-115°F is perfect). If your kitchen is cold, use slightly warmer water. If it's summer and your kitchen is hot, use cooler water. Too hot and you kill the yeast. Too cold and you get sluggish rising.
- Pour your wet ingredients into your dry mixture. Using a stand mixer with a dough hook (or mixing by hand), combine everything until you have a shaggy, rough dough with no dry flour visible. This takes about 1-2 minutes. Then, increase your mixer speed to medium and knead for 5-7 minutes. Your dough should be smooth, elastic, and slightly tacky but not sticky. If it's sticking to the sides of the bowl, add a tablespoon of flour at a time. If it's too dry and crumbly, add water one tablespoon at a time. By hand, this would take about 10 minutes of solid kneading. You'll know you're done when you can stretch a small piece of dough between your fingers without it immediately snapping back—that's the gluten network fully developed.
- Place your dough in a lightly oiled bowl, cover it with a damp kitchen towel (not plastic wrap—you want some air circulation), and let it rise in a warm spot for 45-60 minutes. The dough is ready when it's about doubled in size and you can poke it gently with your finger—if the indentation springs back slowly (not immediately, but not too slowly), you're good to go. Here's my pro tip: if your kitchen is cool, turn your oven on for 2 minutes, then turn it off. Place your dough inside. The residual warmth creates the perfect environment for rising without overheating. This prevents the dough from over-fermenting, which creates a gummy interior.
- This is where people get nervous, but it's actually the easiest part. Turn your dough out onto a lightly floured surface. Gently press it into a rectangle about 16 inches wide by 12 inches tall. Don't stretch it aggressively—let gravity and gentle hands do the work. If it keeps shrinking back, let it rest for 5 minutes and try again. Now, spread your room-temperature butter (1/4 cup) evenly over the dough, leaving about a 1/2-inch border on all sides. Mix your brown sugar and cinnamon together and sprinkle it generously and evenly over the butter. This is not the time to be stingy. Starting from the long side closest to you, roll the dough tightly toward the opposite edge, creating a log. Cut into 12 equal pieces (about 1.5 inches each).
- Arrange your rolls cut-side up in a lightly buttered 9x13-inch baking pan. They should be close together but not touching (they'll expand into each other as they rise, which is exactly what you want). Cover loosely with that damp towel again and let rise for 30-45 minutes. They're ready to bake when they look puffy and spring back slowly when you poke them. Here's what separates home bakers from bakery bakers: they don't over-proof. Your rolls should look pillowy, not like they're about to explode. If they rise too long, the gluten network gets exhausted, and you end up with dense, gummy rolls instead of fluffy ones.
- Preheat your oven to 375°F. Bake your rolls for 20-25 minutes, until the tops are golden-brown and the edges are slightly darker. They should smell absolutely incredible at this point—that's your signal you're close. Insert a toothpick into the center of one roll; if it comes out clean or with just a few moist crumbs, they're done. Let them cool in the pan for 5 minutes (this prevents them from drying out), then transfer them to a wire rack or serving platter.
- While the rolls cool slightly, beat together your room-temperature cream cheese and butter until fluffy (about 2 minutes with a mixer). Add your sifted powdered sugar, vanilla extract, and salt. Beat until smooth and spreadable—not too thick, but not runny either. It should be pourable but still hold its shape on the roll. Spread or drizzle generously over the warm rolls. The warmth of the rolls will soften the glaze slightly, creating that bakery-style finish.
Notes
FAQs
Can I use instant yeast or active dry yeast instead of Fleischmann’s RapidRise?
Technically yes, but with caveats. Fleischmann’s RapidRise yeast (also called bread machine yeast) has smaller particles and activates faster, which is why it’s so reliable for this recipe. If you substitute instant yeast, increase your rising times by 20-30 minutes. Active dry yeast will work but requires even longer rising times and produces a slightly different flavor. If you go this route, expect your total time to increase by 45 minutes to an hour. I’ve done this, and while the rolls turn out fine, they don’t have quite the same fluffy texture.
Why do my rolls turn out dense and gummy?
Nine times out of ten, it’s over-proofing. You let them rise too long, and the gluten network exhausted itself. The second rise should be 30-45 minutes maximum—they should look puffy but not enormous. Another possibility is that your water was too hot when you mixed the dough, which killed some of the yeast and created uneven fermentation. Finally, if your oven temperature is inaccurate, rolls can underbake in the center, creating that gummy texture.
Can I make these rolls without a stand mixer?
Absolutely. Mix everything in a bowl, then knead by hand for 10-12 minutes. It takes longer than a mixer, but the result is the same. Your arms will get a little workout, but the dough will develop beautifully. I actually do this sometimes when I want to feel like I’m making bread from scratch the “old school” way.
What’s the difference between this and a no-knead overnight version?
This recipe uses Fleischmann’s RapidRise yeast and proper kneading, which develops the gluten quickly and creates structure for a fluffier roll. The overnight method relies on long, slow fermentation to develop flavor and structure, so it uses less yeast overall. This recipe is faster and more foolproof if you want fresh rolls on-demand. The overnight method is better if you’re planning ahead and want to sleep in.
Can I add chocolate chips or other mix-ins to the filling?
Of course! I add 1/2 cup of chocolate chips (combined with the brown sugar mixture) when Sofia requests them. I’ve also done 1/2 cup of chopped pecans or walnuts, 1 tablespoon of espresso powder mixed into the cinnamon, or even a sprinkle of sea salt on top of the brown sugar for a salted caramel vibe. Keep the proportions of butter and brown sugar the same—you’re just adding to them, not replacing them.
More Recipes You’ll Love
- Monkey Bread with Cream Cheese Glaze Recipe — Sweet, indulgent, and somehow even easier than cinnamon rolls
- Soft Pretzel Bagels — Another yeast-based recipe that feels fancy but comes together beautifully with the right method
- Best Recipe Pumpkin Cheesecake — For when you want something equally impressive but slightly less hands-on
Here’s the thing about this recipe: it proves that homemade doesn’t have to mean complicated. Sofia still asks about those bakery rolls sometimes, but she also asks me to make these. The fact that I can produce something she genuinely prefers—something I made with my own hands, from ingredients I can pronounce—is worth every minute of my time. This Fleischmann’s method respects that time. It doesn’t ask you to wake up at dawn or